 }); 2022 - Wilma Westenberg. Great cardigan can i ask if this is double crochet in uk terms or triple crochet in uk terms pls xxx. In fact,blanketsand cardigans are two of my favorite items to crochet because theyre so easy, satisfying, and practical. Every step was perfect. ch 3, (1 dc, ch 2, 1 dc) in each ch-3 turning space around, sl st in 1st dc (14, 16, 16, 18, 18, 20, 20, 22 ch-sp). Try to line the panels up so the rows are even.
  In this case, 87% of readers who voted found the article helpful, earning it our reader-approved status. I made this crocheted cardigan pattern with beginner crocheters in mind. Its simple, and I take the guessing game out of it by showing you how! To learn how to crochet a hemline or make a ribbed edge, keep reading! And, as a beginner, nothing is more straightforward than crocheting a rectangle! Bigger projects can become very expensive as you need a lot of yarn. References ch-sp: chain space Check out this roundup of my favorite free crochet cardigan patterns for inspiration.
 Lion Brand Touch of Merino(Weight 3/Light, 3.5 oz/100g, 257 yds/237m) Whats comfier than wearing a blanket? Im sharing my top crochet cardigan patterns that beginners can make. I pulled some of my favorite patterns together to share with you. Hi, How many balls of wool will be needed for a 2xl size, thank u, Im one who likes to button her sweaters, but I really, really want to make this pattern. If you know how to make double crochet stitches and chains, you can make this cardigan. This crochet cardigan pattern is unique and timeless, thanks to the look and vibe of granny squares. This acrylic and merino wool blend hasspringy stitches, cashmere-like feel and excellent drape. How do I know how long my chain should be? I love your crochet patterns, Wilma, but this one is probably my favorite out of everything I have ever made in my four years of crocheting! When only one number is given, it applies to all sizes. Designed with a longer fit and big pockets, this comfy sweater will keep you warm all season long. wikiHow marks an article as reader-approved once it receives enough positive feedback. Repeat round 2 until round 7 or until your cuff measures 2. Row 1: If you have any questions about my crochet patterns, feel free to join my Facebook Group. Many thanks! By using our site, you agree to our. | Privacy Policy | Disclaimer | FAQ | Donate All photos and patterns are copyright of Wilma Westenberg unless otherwise noted. Thanks.
  Do not break yarn after second front panel. Fasten off, weave ends. The entire cardigan design is made by crocheting basic granny squares and seaming them together. Level up your tech skills and stay ahead of the curve.
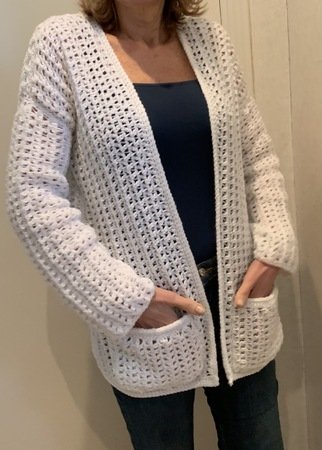
  This cardi is one of the softest, most comfortable designs Ive made. Its great for beginners because you just need to know how to double crochet and make chain stitches. ch 3, (1 dc, ch 2, 1 dc) in next11 (12, 14, 15, 17, 18, 19, 21) ch-sp, turn (11, 12, 14, 15, 17, 18, 19, 21 ch-sp). But it might be just what you want if you tend to feel cold a lot during the winter. Theyre so versatile, comfy, and cozy! The PDF is designed for printing and this way you can support me! too many. Neckline ribbing I aimed for the same length and fit and used Lion Brands Touch of Merino yarn which is very soft. All tip submissions are carefully reviewed before being published.
  Thanks to all authors for creating a page that has been read 66,339 times.
  The entire project is made with the basic single crochet stitch with very little shaping, so its an easy pattern thats ideal for beginners. Ive made two of these cardigans so far in Touch of Merino red (L) and pink (XS) colors and am looking forward to making a third soon in blue (XL). To follow the pattern more easily, circle all numbers pertaining to your size before beginning. I love the buttons for keeping it closed when you want! Directions for sizes are in parentheses such as chain 67 (73, 85, 91, 103, 109, 115, 127) whereas ch 76 stands for size S, 73 for M, 85 for L, 91 for XL, 103 for 2XL, 109 for 3XL, 115 for 4XL, 127 for 5XL. I would love to become friends on social media!
  Jessica also completed an MA in History from The University of Oregon in 2013. I love wearing cozy plush versions in the winter, chunky and oversized designs in the spring and fall, and airy and lacy patterns in the summer. Im sorry. sl st in next ch-sp, ch 3 (does not count as first dc), 2 dc in each ch-sp around (28, 32, 32, 36, 36, 40, 40, 44 dc), Round 2: Plus, they provide just the right level of warmth for any time of the year. Your patterns are absolutely beautiful. Say hello to your new fall wardrobe staple! This stitch truly is a yarn saver, because I only needed about 3.5 balls for size S! For reference, model is 1.63m/54 tall with a 34 bust and wearing the cardigan in size Small. Fasten off, weave ends. You measure from dc to dc. Good thing this summer fun cardi keeps it light and airy while adding that perfect cover for the pool, the beach, or a cool summer evening. Thank you for sharing it and the videos. Assembly The first one I used Red hearts Roll With It Sparkle yarn, the second I used Lion Brand Scarfie. Kisses!! I wanted to use a stitch that doesnt eat too much yarn and used one of my favorite stitches: the v-stitch which is made with (1 dc, ch 2, 1 dc) in the same stitch.
  This design uses double and treble crochet stitches to provide the lacy look that makes this cardi so special. (1 dc, ch 2, 1 dc) in each ch-sp around (14, 16, 16, 18, 18, 20, 20, 22 ch-sp). Please do not reprint, publish or post my material. Dont break yarn yet as were going to continue working on the first front panel.
  Do you mean to do the V stitch and then measure the spaces you create with it? Click here to grab the kit which includes all the yarn you need for your size + a PDF version of this pattern!
  The cuffs and neckline are made with fpdc & bpdc alternating, creating a fun textured ribbing. There are 24 references cited in this article, which can be found at the bottom of the page.
  Over the years, Ive created many different crochet cardigan patterns. For the back section, Step 3 of Making the Back Piece lists the number of stitches for each size and for the front panels, Step 1 of Crocheting the Front Panels. fpdc: front post double crochet Join these pieces to form the body of the cardigan. You can also weave in any loose ends that you may have from adding skeins of yarn. How do you measure chain spaces to do the gauge swatch? Pair this cozy and practical sweater with leggings or jeans when you want a relaxed look. Thank you! This article has been viewed 66,339 times. In this video you can see how to make this cardigan. Use a tapestry needle and your long beginning tail to close the hole between the first and last ch-sp. Theres truly a perfect cardigan for every occasion, and I am a firm believer that you can never have (or make!) ( ) at end of a row: amount of stitches you should have at the end of that row, This pattern is written in US terminology. Jessica Gibson is a Writer and Editor who's been with wikiHow since 2014. With hook size 5 mm: Round 1: This free crochet pattern makes a garment thats slouchy, floppy, and ultra-comfy. This design is almost entirely done in the Vstitch, which uses beginner-friendly double crochet stitches. If you have just a little experience under your belt, dont let it turn you away because its easy to learn! You may have a description of my post and one picture while linking back to my site. This pattern uses super simple construction to yield a flattering and relaxed fit. yours is perfect! The complete cardigan is made out of V-stitches: (1 dc, ch 2, 1 dc) in the same stitch. Do you think I could add buttons and loop closures without ruining the front line? I would love to see what colors you used and feature some of your pictures! ch 3 (does not count as a st here and throughout), (1 dc, ch 2, 1 dc) in each ch-sp across, turn (22, 24, 28, 30, 34, 36, 38, 42 ch-sp). sl st: slip stitch My favorite part might be the variety of fun colors without the need to change yarn colors, thanks to the color-changing yarn I used. We use cookies to make wikiHow great. Who doesnt love cardigans? Begin the sleeves by crocheting in the round, then attach them to the body. Its not clicking for me. Both cardigans were warmly welcomed by their new owners. When I fit it on, it was absolute a nice feeling.
  Although I try to publish straightforward designs that anyone can make, occasionally, I enjoy doing a slightly more complex design and sharing it. Start by crocheting a back piece and 2 front panels. With hook size 6 mm: Row 1: **, With hook size 6mm, chain 67 (73, 85, 91, 103, 109, 115, 127), turn, Row 1: Sleeves are joined in the arm hole and worked in continuous rounds. Then, crochet 2 sleeves and attach them to the armholes. Fasten off and leave a long end for sewing. I will definitely safe this pattern for future use. So here we go! I love to crochet cardigans! Although its a very beginner-friendly skill level, I recommend practicing the Textured Section stitch pattern with your crochet hook (tutorial provided) on a small swatch before starting this design. Thankyou for sharing your talent with us You can know that while I accept sponsorship and use affiliate programs, I will not use or promote anything that I do not believe in personally. This is a very beginner-friendly pattern. If you'd like to check your gauge, the 13 half-double crochet stitches and 11 rows should equal 4 inches (10cm).
  I'm Wilma, a 26 year old crochet designer from Holland. Round 2: Pattern contains instructions for sizes S, M, L, XL, 2XL, 3XL, 4XL, 5XL. It also contains affiliate links for which I am paid a small commission if you make a purchase through the link on my site. This beginner-friendly design has minimal shaping and is crocheted in panels, so its easy to make. I like sharing my easy & timeless knit and crochet projects and patterns. Make this simple crochet cardigan with mybeginner-friendly pattern for beginners available in size S up to 5XL. Ok, in full disclosure, this pattern is more of a jacket than a cardigan. This article was co-authored by wikiHow staff writer. Privacy Policy under Contact for more. All material Copyright Mama In A Stitch unless otherwise noted. The vintage lace and dreamy drape make this cardigan pattern a showstopper. The front and back panels are worked in one piece and sleeves are joined in the arm hole with continuous rounds. Its a great go-to for newer crocheters! Hi, I'm Jessica! Begin at the bottom, work your way up and leave 14 (16, 16, 18, 18, 20, 20, 22) ch-sp or7 (8, 8, 9, 9, 10, 10, 11) open for the arm hole. Ive been busy sharing some of them, and I figured it might be nice to combine several of the ones Ive shared into one easy-to-find post. This article was co-authored by wikiHow staff writer, Jessica Gibson. ", http://www.sewrella.com/everyday-crochet-cardigan/, https://www.1dogwoof.com/make-foundation-single-crochet-fsc/, https://www.1dogwoof.com/make-foundation-half-double-crochet-stitch-fhdc/, http://www.lionbrand.com/how-to-crochet-fastening-off/. Repeat round 2 until round 26 (26, 27, 27, 28, 28, 29, 29)or until sleeve measures 15.5 (15.5, 16, 16, 16.5, 16.5, 17, 17). Pat, I have made 2 of these cardigans. You'll also find some random thoughts and a bit of nature - Come on in!
  What exactly is the 5.3?
  4 (4, 5, 5, 6, 6, 6, 7) skeins in Oxford Grey dc: double crochet
  Crochet cardigan patterns like this one work the sleeves in rounds, but dont let that turn you away. You'll be enjoying your new cardigan in no time! *Click hereto watch the video on YouTube, ** Note: You can purchase the ad-freePDF version of this pattern onEtsyandRavelry. Pattern is worked in one piece from the back panel bottom-up to the first front panel without breaking yarn, then rejoined for the second front panel. Whether youre a beginner or experienced crocheter looking for something different than shawls, this is a great garment project to start with! Your admirer & friend in Canada, Hi, can you show us how to make a gauge and measure it? My closet is filled with cardigans. If you love granny squares, youll probably love this comfy cardigan!
 If you know how to make double crochet stitches and chains, you can make this cardigan! The PDF is designed for printing and this way you can support me! However, with a bit of practice, anyone can make this cardigan. Hi Sabra, a gauge with 5.3 V-st = 4 inch means that when you work 5.3 v-stitches (1 v-st = 1 dc, ch 2, 1 dc), it should measure 4 inch. This one is an example for the more advanced crocheter and may not work well for true beginners. The crochet cardigan pattern offers lots of flexibility to adapt it into precisely the cardi you dream of.
  This will make the wrist of the sleeve. If you are going to make this simple crochet cardigan, pleasetagme@wilmawestenbergon Instagram and add this pattern to yourRavelry queue. document.getElementById( "ak_js_1" ).setAttribute( "value", ( new Date() ).getTime() ); window.fd('form', { For this cardigan Ive used Lion Brands Touch of Merino yarn which ispart of the Touch of Luxe Yarn collection. This was helpful and concise. If youre a visual learner, I encourage you to check outmy YouTube channelto find crochet video tutorials on any pattern you want to learn. formId: '5f6b6656692a71c058043aa2', When its sizzling outside, you dont want to wrap up in anything heavy. sleeves perfect, body fit perfect. If youre looking for a plush warm jacket to wear over the winter season, this may be it! It also features a beautiful ribbed neckline which is worked in rows. bpdc: back post double crochet, * *: repeat what is between the asterisks as many times as directed Very easy-to-follow pattern, thank you.". The videos that you make to go with them are very well done & very helpful. . All patterns are created with an attempt to be as accurate as possible but are made and tested by humans and therefore may contain errors. preferably something like this style. Repeat row 2 until row 7 or until your total neckline ribbing measures 2. I would love to try making this cardigan but can you recommend a different yarn as Im allergic to wool. containerEl: '#fd-form-5f6b6656692a71c058043aa2' Save my name, email, and website in this browser for the next time I comment. my first cardigan and then go on to make variations.
  I especially like to make garments, shawls, hats, items for babies and home/interior. I say that its not as beginner-friendly because the drop stitch isnt one that most beginners know. It is a wonderful pattern to work with & adapt to different yarns & hooks. This website makes use of sponsored links and/or advertisements. Last Updated: September 12, 2021 Mama, Colorado gal, lover of yarn and life. Please. I found Simple crochet cardigan pattern for beginners: Touch of Merino Cardigan very educational. or 355 (385, 425, 460, 510, 540, 565, 620) grams Hemline ribbing is worked in back and forth rows. Join yarn to one of the corners. To complete the back, continue this pattern until you reach row 58. If you know how to half double crochet, youre set! This sweater is made with velvet (yep, you heard me right!) My sweater came out great and I wear it all the time! With hook size 6 mm, joinyarn to first ch-sp of arm pit. Approved. Beginners will be happy to know that this project uses basic shapes and simple stitch patterns. Its available in 8 colors and an affordable alternative to the expensive merino wool options. This will make seaming them together easier. This pattern is so helpful, thank you very much. Please do not repost or claim my content as your own. It works up similarly to a cardigan, and the Sherpa Fleece yarn is perfect for those brisk winter days. Toppers are my go-to for throwing on when Im running out the door or covering my shoulders on cool summer nights and fall days. If you'd like to make a ribbed stitch, crochet the next few rows by alternating a front and back post double crochet. I love the fantastic drape and understated boho look of this simple crochet cardigan pattern. Work in continuous rounds. Hope this helps! Its just such a relaxing and simple pattern, with such a pleasing and useful result. Thank you! I bought the pattern but it doesnt explain this. Please dont use my photography if you use my patterns to make and sell finished product. Im almost finished the butterfly shawl & will be making the sleeveless scarfie top next for a friend. window.fd('form', { formId: '5f6b5dbfbf43d87e3fbfa775', containerEl: '#fd-form-5f6b5dbfbf43d87e3fbfa775' }); Hi! There are even more on the site (and Im always adding more designs), so dont feel limited by this list, but its a great starting point! Its light and airy, fits well, looks stylish, and the bamboo soft yarn gives a whole new meaning to the word soft! Shrugs like this one are a cinch to crochet because all you do is make two rectangles and seam them together up the back and the sides. Round 1: ch 3, 1 dc in 1st st, 2 dc in each ch-sp across, 1 dc in last st (176, 180, 184, 188, 192, 196, 200, 204 st), Row 2: Make sure you select the correct number of stitches for the correct size. Then, to make the simple shape of this cardi, all you need to do is create two rectangles and seam them together. By signing up you are agreeing to receive emails according to our privacy policy.
 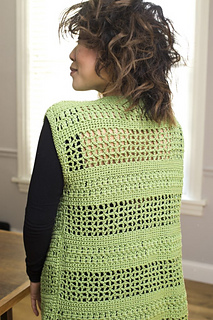 Match the side seams and sew both sides together. Are you searching for summer crochet cardigans? ch 3, 1 dc in 1st st, *1 fpdc in next st, 1 bpdc in next st* repeat across, 1 dc in last st (176, 180, 184, 188, 192, 196, 200, 204 st). ", "First time making a cardigan for my husband. This is the BEST pattern! Whether you want long sleeves, short sleeves, bulky, or oversized crochet cardigan patterns, you can find the free patterns below! I will walk you through it step-by-step. If youre ready to crochet your first cardigan, I cant recommend this one enough, thanks to its simple design and the use of half double crochet stitches. Dont break yarn yet as were going to continue working on the cuff. To crochet a cardigan, start the back by chaining 57 stitches if it will be a size medium. It has a simple construction with the back and front panel worked in one piece and sleeves joined in the arm hole. I share all my free crochet patterns here on my blog. Where can I get the free pattern for the grey touch of Merino sweater? wikiHow is where trusted research and expert knowledge come together.
  The eyelets are easier than they look and create simple cardigans that stun. Join yarn to the next stitch and repeat on the other side to create the second front panel. "Was looking for an illustrated step-by-step for the construction of a cardigan. what a joy to have a cardigan with clear simple lines, sleeves ending just right with no baggy back I made this kimono with an airy, open mesh stitch pattern to create a drapey, lightweight fabric perfect for summer. st: stitch Repeat row 1 until row 42 (43, 44, 45, 46, 47, 48, 49)or until front panel measures21 (21.5, 22, 22.5, 23, 23.5, 24, 24.5). Once you become familiar with the stitch pattern, it becomes pretty mindless and works up quickly. Make sure to use a loose tension. The entire piece is crocheted in basic shapes, uses beginner stitches, and has light shaping at the sleeves. I created this group for you to share pictures/ progress, ask questions and to help each other out. most of what ive seen in sweater patterns are ill-fitting.
  Hi! Repeat sleeve + sleeve cuff on the other side.
  Theres a flowing collar, textured stitches, and a lovely lengthy fit with very minimal shaping. hoo thank you no button holes i have found unless the ribbing is tight the button bands pull the fronts out of shape or make it look rugged up and not laying smoothly, please keep designing simple clear line clothing. All you need to know is how to make chains and double crochet stitches. The endless eyelets and two-row repeat granny stitch pattern create an airy and drapey final product that looks terrific with jeans, shorts, or swimsuits! From now on well work in continuous rounds. What a lovely pattern to crochet. I think that at this point, Ive got designs for every style and season. Im always a fan of making a cardigan that is super cozy, chunky, and oversized. Use neutrals or go hippy by making it multi-colored.
 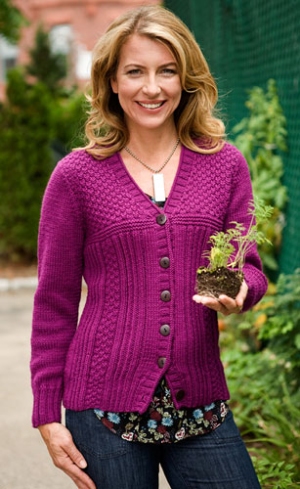 Heads up: While this isnt one of the most beginner-friendly crochet cardigan patterns on this list, it is easy to do and uses basic stitches. All you need is beginner-level crochet skills (including the half double crochet and slip stitches) to get started, so its ideal for any crocheter. Include your email address to get a message when this question is answered. https://s96.me/ingenious-way-to-learn-piano-and-keyboard This is the ultimate spring cardi featuring a relaxed design with an on-trend cropped fit and understated bubble sleeves. ", "First time doing a cardigan. It does use a slightly different process for crocheting the sleeves, but its easy.
 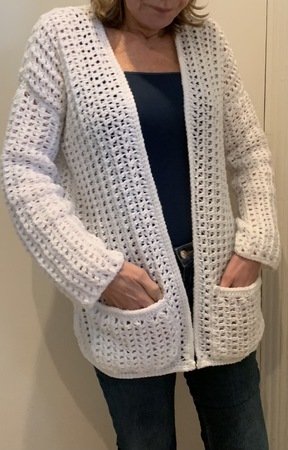 Isnt it great? Do you have a pattern for a mans cardigan sweater that has tight stitches and large pockets?
  There are few things as comforting and cosy as a homemade cardigan. *1 fpdc in next st, 1 bpdc in next st* repeat around(28, 32, 32, 36, 36, 40, 40, 44 st). for a super soft, cute piece thats perfect to wear in both winter and spring. After completing a year of art studies at the Emily Carr University in Vancouver, she graduated from Columbia College with a BA in History. This simple crochet cardigan is designed keeping beginners into account and youll be surprised by the simplicity of this project. Its a beautiful, comfortable kimono cardigan with a generous collar that youll reach for on cool days. "By showing the basic design of a cardigan, no fuss, just straightforward construction, I'm now confident I can make. Work 1 sc in the first stitch, *2 sc in each ch-2 sp, 1 sc in between the spaces* across. % of people told us that this article helped them. First front panel is finished. Leave a long beginning tail to use for seaming later. This blog/website displays third party ads. very nice fit. If youve never crocheted granny squares before, youll pick it up very quickly. End cuff with a sc in next st, sl st in next st. Fasten off, weave ends. 3 turning chains do not count as a stitch. (1 dc, ch 2, 1 dc) in 4th chain from hook, *skip 2 ch, (1 dc, ch 2, 1 dc) in next ch* repeat across, turn (22, 24, 28, 30, 34, 36, 38, 42 ch-sp), Row 2: I thank you kindly for supporting my blog in this way. {"smallUrl":"https:\/\/www.wikihow.com\/images\/thumb\/a\/a0\/Crochet-a-Cardigan-Step-1.jpg\/v4-460px-Crochet-a-Cardigan-Step-1.jpg","bigUrl":"\/images\/thumb\/a\/a0\/Crochet-a-Cardigan-Step-1.jpg\/aid9747373-v4-728px-Crochet-a-Cardigan-Step-1.jpg","smallWidth":460,"smallHeight":345,"bigWidth":728,"bigHeight":546,"licensing":"
License: Creative Commons<\/a> License: Creative Commons<\/a> License: Creative Commons<\/a> License: Creative Commons<\/a> License: Creative Commons<\/a> License: Creative Commons<\/a> License: Creative Commons<\/a> License: Creative Commons<\/a> License: Creative Commons<\/a> License: Creative Commons<\/a> License: Creative Commons<\/a> License: Creative Commons<\/a> License: Creative Commons<\/a> License: Creative Commons<\/a> License: Creative Commons<\/a> License: Creative Commons<\/a> License: Creative Commons<\/a> License: Creative Commons<\/a> License: Creative Commons<\/a> License: Creative Commons<\/a> License: Creative Commons<\/a> License: Creative Commons<\/a> License: Creative Commons<\/a> License: Creative Commons<\/a> License: Creative Commons<\/a> License: Creative Commons<\/a> License: Creative Commons<\/a> License: Creative Commons<\/a>
\n<\/p>
\n<\/p><\/div>"}, {"smallUrl":"https:\/\/www.wikihow.com\/images\/thumb\/6\/67\/Crochet-a-Cardigan-Step-2.jpg\/v4-460px-Crochet-a-Cardigan-Step-2.jpg","bigUrl":"\/images\/thumb\/6\/67\/Crochet-a-Cardigan-Step-2.jpg\/aid9747373-v4-728px-Crochet-a-Cardigan-Step-2.jpg","smallWidth":460,"smallHeight":345,"bigWidth":728,"bigHeight":546,"licensing":"
\n<\/p>
\n<\/p><\/div>"}, {"smallUrl":"https:\/\/www.wikihow.com\/images\/thumb\/6\/6a\/Crochet-a-Cardigan-Step-3.jpg\/v4-460px-Crochet-a-Cardigan-Step-3.jpg","bigUrl":"\/images\/thumb\/6\/6a\/Crochet-a-Cardigan-Step-3.jpg\/aid9747373-v4-728px-Crochet-a-Cardigan-Step-3.jpg","smallWidth":460,"smallHeight":345,"bigWidth":728,"bigHeight":546,"licensing":"
\n<\/p>
\n<\/p><\/div>"}, {"smallUrl":"https:\/\/www.wikihow.com\/images\/thumb\/0\/00\/Crochet-a-Cardigan-Step-4.jpg\/v4-460px-Crochet-a-Cardigan-Step-4.jpg","bigUrl":"\/images\/thumb\/0\/00\/Crochet-a-Cardigan-Step-4.jpg\/aid9747373-v4-728px-Crochet-a-Cardigan-Step-4.jpg","smallWidth":460,"smallHeight":345,"bigWidth":728,"bigHeight":546,"licensing":"
\n<\/p>
\n<\/p><\/div>"}, {"smallUrl":"https:\/\/www.wikihow.com\/images\/thumb\/9\/9a\/Crochet-a-Cardigan-Step-5.jpg\/v4-460px-Crochet-a-Cardigan-Step-5.jpg","bigUrl":"\/images\/thumb\/9\/9a\/Crochet-a-Cardigan-Step-5.jpg\/aid9747373-v4-728px-Crochet-a-Cardigan-Step-5.jpg","smallWidth":460,"smallHeight":345,"bigWidth":728,"bigHeight":546,"licensing":"
\n<\/p>
\n<\/p><\/div>"}, {"smallUrl":"https:\/\/www.wikihow.com\/images\/thumb\/c\/ca\/Crochet-a-Cardigan-Step-6.jpg\/v4-460px-Crochet-a-Cardigan-Step-6.jpg","bigUrl":"\/images\/thumb\/c\/ca\/Crochet-a-Cardigan-Step-6.jpg\/aid9747373-v4-728px-Crochet-a-Cardigan-Step-6.jpg","smallWidth":460,"smallHeight":345,"bigWidth":728,"bigHeight":546,"licensing":"
\n<\/p>
\n<\/p><\/div>"}, {"smallUrl":"https:\/\/www.wikihow.com\/images\/thumb\/2\/2b\/Crochet-a-Cardigan-Step-7.jpg\/v4-460px-Crochet-a-Cardigan-Step-7.jpg","bigUrl":"\/images\/thumb\/2\/2b\/Crochet-a-Cardigan-Step-7.jpg\/aid9747373-v4-728px-Crochet-a-Cardigan-Step-7.jpg","smallWidth":460,"smallHeight":345,"bigWidth":728,"bigHeight":546,"licensing":"
\n<\/p>
\n<\/p><\/div>"}, {"smallUrl":"https:\/\/www.wikihow.com\/images\/thumb\/7\/75\/Crochet-a-Cardigan-Step-8.jpg\/v4-460px-Crochet-a-Cardigan-Step-8.jpg","bigUrl":"\/images\/thumb\/7\/75\/Crochet-a-Cardigan-Step-8.jpg\/aid9747373-v4-728px-Crochet-a-Cardigan-Step-8.jpg","smallWidth":460,"smallHeight":345,"bigWidth":728,"bigHeight":546,"licensing":"
\n<\/p>
\n<\/p><\/div>"}, {"smallUrl":"https:\/\/www.wikihow.com\/images\/thumb\/e\/ee\/Crochet-a-Cardigan-Step-9.jpg\/v4-460px-Crochet-a-Cardigan-Step-9.jpg","bigUrl":"\/images\/thumb\/e\/ee\/Crochet-a-Cardigan-Step-9.jpg\/aid9747373-v4-728px-Crochet-a-Cardigan-Step-9.jpg","smallWidth":460,"smallHeight":345,"bigWidth":728,"bigHeight":546,"licensing":"
\n<\/p>
\n<\/p><\/div>"}, {"smallUrl":"https:\/\/www.wikihow.com\/images\/thumb\/2\/2e\/Crochet-a-Cardigan-Step-10.jpg\/v4-460px-Crochet-a-Cardigan-Step-10.jpg","bigUrl":"\/images\/thumb\/2\/2e\/Crochet-a-Cardigan-Step-10.jpg\/aid9747373-v4-728px-Crochet-a-Cardigan-Step-10.jpg","smallWidth":460,"smallHeight":345,"bigWidth":728,"bigHeight":546,"licensing":"
\n<\/p>
\n<\/p><\/div>"}, {"smallUrl":"https:\/\/www.wikihow.com\/images\/thumb\/e\/eb\/Crochet-a-Cardigan-Step-11.jpg\/v4-460px-Crochet-a-Cardigan-Step-11.jpg","bigUrl":"\/images\/thumb\/e\/eb\/Crochet-a-Cardigan-Step-11.jpg\/aid9747373-v4-728px-Crochet-a-Cardigan-Step-11.jpg","smallWidth":460,"smallHeight":345,"bigWidth":728,"bigHeight":546,"licensing":"
\n<\/p>
\n<\/p><\/div>"}, {"smallUrl":"https:\/\/www.wikihow.com\/images\/thumb\/0\/00\/Crochet-a-Cardigan-Step-12.jpg\/v4-460px-Crochet-a-Cardigan-Step-12.jpg","bigUrl":"\/images\/thumb\/0\/00\/Crochet-a-Cardigan-Step-12.jpg\/aid9747373-v4-728px-Crochet-a-Cardigan-Step-12.jpg","smallWidth":460,"smallHeight":345,"bigWidth":728,"bigHeight":546,"licensing":"
\n<\/p>
\n<\/p><\/div>"}, {"smallUrl":"https:\/\/www.wikihow.com\/images\/thumb\/c\/ca\/Crochet-a-Cardigan-Step-13.jpg\/v4-460px-Crochet-a-Cardigan-Step-13.jpg","bigUrl":"\/images\/thumb\/c\/ca\/Crochet-a-Cardigan-Step-13.jpg\/aid9747373-v4-728px-Crochet-a-Cardigan-Step-13.jpg","smallWidth":460,"smallHeight":345,"bigWidth":728,"bigHeight":546,"licensing":"
\n<\/p>
\n<\/p><\/div>"}, {"smallUrl":"https:\/\/www.wikihow.com\/images\/thumb\/f\/fc\/Crochet-a-Cardigan-Step-14.jpg\/v4-460px-Crochet-a-Cardigan-Step-14.jpg","bigUrl":"\/images\/thumb\/f\/fc\/Crochet-a-Cardigan-Step-14.jpg\/aid9747373-v4-728px-Crochet-a-Cardigan-Step-14.jpg","smallWidth":460,"smallHeight":345,"bigWidth":728,"bigHeight":546,"licensing":"
\n<\/p>
\n<\/p><\/div>"}, {"smallUrl":"https:\/\/www.wikihow.com\/images\/thumb\/0\/08\/Crochet-a-Cardigan-Step-15.jpg\/v4-460px-Crochet-a-Cardigan-Step-15.jpg","bigUrl":"\/images\/thumb\/0\/08\/Crochet-a-Cardigan-Step-15.jpg\/aid9747373-v4-728px-Crochet-a-Cardigan-Step-15.jpg","smallWidth":460,"smallHeight":345,"bigWidth":728,"bigHeight":546,"licensing":"
\n<\/p>
\n<\/p><\/div>"}, {"smallUrl":"https:\/\/www.wikihow.com\/images\/thumb\/b\/b4\/Crochet-a-Cardigan-Step-16.jpg\/v4-460px-Crochet-a-Cardigan-Step-16.jpg","bigUrl":"\/images\/thumb\/b\/b4\/Crochet-a-Cardigan-Step-16.jpg\/aid9747373-v4-728px-Crochet-a-Cardigan-Step-16.jpg","smallWidth":460,"smallHeight":345,"bigWidth":728,"bigHeight":546,"licensing":"
\n<\/p>
\n<\/p><\/div>"}, {"smallUrl":"https:\/\/www.wikihow.com\/images\/thumb\/b\/be\/Crochet-a-Cardigan-Step-17.jpg\/v4-460px-Crochet-a-Cardigan-Step-17.jpg","bigUrl":"\/images\/thumb\/b\/be\/Crochet-a-Cardigan-Step-17.jpg\/aid9747373-v4-728px-Crochet-a-Cardigan-Step-17.jpg","smallWidth":460,"smallHeight":345,"bigWidth":728,"bigHeight":546,"licensing":"
\n<\/p>
\n<\/p><\/div>"}, {"smallUrl":"https:\/\/www.wikihow.com\/images\/thumb\/c\/c7\/Crochet-a-Cardigan-Step-18.jpg\/v4-460px-Crochet-a-Cardigan-Step-18.jpg","bigUrl":"\/images\/thumb\/c\/c7\/Crochet-a-Cardigan-Step-18.jpg\/aid9747373-v4-728px-Crochet-a-Cardigan-Step-18.jpg","smallWidth":460,"smallHeight":345,"bigWidth":728,"bigHeight":546,"licensing":"
\n<\/p>
\n<\/p><\/div>"}, {"smallUrl":"https:\/\/www.wikihow.com\/images\/thumb\/f\/f0\/Crochet-a-Cardigan-Step-19.jpg\/v4-460px-Crochet-a-Cardigan-Step-19.jpg","bigUrl":"\/images\/thumb\/f\/f0\/Crochet-a-Cardigan-Step-19.jpg\/aid9747373-v4-728px-Crochet-a-Cardigan-Step-19.jpg","smallWidth":460,"smallHeight":345,"bigWidth":728,"bigHeight":546,"licensing":"
\n<\/p>
\n<\/p><\/div>"}, {"smallUrl":"https:\/\/www.wikihow.com\/images\/thumb\/e\/ec\/Crochet-a-Cardigan-Step-20.jpg\/v4-460px-Crochet-a-Cardigan-Step-20.jpg","bigUrl":"\/images\/thumb\/e\/ec\/Crochet-a-Cardigan-Step-20.jpg\/aid9747373-v4-728px-Crochet-a-Cardigan-Step-20.jpg","smallWidth":460,"smallHeight":345,"bigWidth":728,"bigHeight":546,"licensing":"
\n<\/p>
\n<\/p><\/div>"}, {"smallUrl":"https:\/\/www.wikihow.com\/images\/thumb\/4\/49\/Crochet-a-Cardigan-Step-21.jpg\/v4-460px-Crochet-a-Cardigan-Step-21.jpg","bigUrl":"\/images\/thumb\/4\/49\/Crochet-a-Cardigan-Step-21.jpg\/aid9747373-v4-728px-Crochet-a-Cardigan-Step-21.jpg","smallWidth":460,"smallHeight":345,"bigWidth":728,"bigHeight":546,"licensing":"
\n<\/p>
\n<\/p><\/div>"}, {"smallUrl":"https:\/\/www.wikihow.com\/images\/thumb\/f\/fa\/Crochet-a-Cardigan-Step-22.jpg\/v4-460px-Crochet-a-Cardigan-Step-22.jpg","bigUrl":"\/images\/thumb\/f\/fa\/Crochet-a-Cardigan-Step-22.jpg\/aid9747373-v4-728px-Crochet-a-Cardigan-Step-22.jpg","smallWidth":460,"smallHeight":345,"bigWidth":728,"bigHeight":546,"licensing":"
\n<\/p>
\n<\/p><\/div>"}, {"smallUrl":"https:\/\/www.wikihow.com\/images\/thumb\/a\/a8\/Crochet-a-Cardigan-Step-23.jpg\/v4-460px-Crochet-a-Cardigan-Step-23.jpg","bigUrl":"\/images\/thumb\/a\/a8\/Crochet-a-Cardigan-Step-23.jpg\/aid9747373-v4-728px-Crochet-a-Cardigan-Step-23.jpg","smallWidth":460,"smallHeight":345,"bigWidth":728,"bigHeight":546,"licensing":"
\n<\/p>
\n<\/p><\/div>"}, {"smallUrl":"https:\/\/www.wikihow.com\/images\/thumb\/c\/c8\/Crochet-a-Cardigan-Step-24.jpg\/v4-460px-Crochet-a-Cardigan-Step-24.jpg","bigUrl":"\/images\/thumb\/c\/c8\/Crochet-a-Cardigan-Step-24.jpg\/aid9747373-v4-728px-Crochet-a-Cardigan-Step-24.jpg","smallWidth":460,"smallHeight":345,"bigWidth":728,"bigHeight":546,"licensing":"
\n<\/p>
\n<\/p><\/div>"}, {"smallUrl":"https:\/\/www.wikihow.com\/images\/thumb\/e\/e1\/Crochet-a-Cardigan-Step-25.jpg\/v4-460px-Crochet-a-Cardigan-Step-25.jpg","bigUrl":"\/images\/thumb\/e\/e1\/Crochet-a-Cardigan-Step-25.jpg\/aid9747373-v4-728px-Crochet-a-Cardigan-Step-25.jpg","smallWidth":460,"smallHeight":345,"bigWidth":728,"bigHeight":546,"licensing":"
\n<\/p>
\n<\/p><\/div>"}, {"smallUrl":"https:\/\/www.wikihow.com\/images\/thumb\/2\/21\/Crochet-a-Cardigan-Step-26.jpg\/v4-460px-Crochet-a-Cardigan-Step-26.jpg","bigUrl":"\/images\/thumb\/2\/21\/Crochet-a-Cardigan-Step-26.jpg\/aid9747373-v4-728px-Crochet-a-Cardigan-Step-26.jpg","smallWidth":460,"smallHeight":345,"bigWidth":728,"bigHeight":546,"licensing":"
\n<\/p>
\n<\/p><\/div>"}, {"smallUrl":"https:\/\/www.wikihow.com\/images\/thumb\/9\/9f\/Crochet-a-Cardigan-Step-27.jpg\/v4-460px-Crochet-a-Cardigan-Step-27.jpg","bigUrl":"\/images\/thumb\/9\/9f\/Crochet-a-Cardigan-Step-27.jpg\/aid9747373-v4-728px-Crochet-a-Cardigan-Step-27.jpg","smallWidth":460,"smallHeight":345,"bigWidth":728,"bigHeight":546,"licensing":"
\n<\/p>
\n<\/p><\/div>"}, {"smallUrl":"https:\/\/www.wikihow.com\/images\/thumb\/4\/42\/Crochet-a-Cardigan-Step-28.jpg\/v4-460px-Crochet-a-Cardigan-Step-28.jpg","bigUrl":"\/images\/thumb\/4\/42\/Crochet-a-Cardigan-Step-28.jpg\/aid9747373-v4-728px-Crochet-a-Cardigan-Step-28.jpg","smallWidth":460,"smallHeight":345,"bigWidth":728,"bigHeight":546,"licensing":"
\n<\/p>
\n<\/p><\/div>"}, {"smallUrl":"https:\/\/www.wikihow.com\/images\/thumb\/e\/ea\/Crochet-a-Cardigan-Step-29.jpg\/v4-460px-Crochet-a-Cardigan-Step-29.jpg","bigUrl":"\/images\/thumb\/e\/ea\/Crochet-a-Cardigan-Step-29.jpg\/aid9747373-v4-728px-Crochet-a-Cardigan-Step-29.jpg","smallWidth":460,"smallHeight":345,"bigWidth":728,"bigHeight":546,"licensing":"