So our image comes out reversed. Bookmark this handy 'cheat-sheet' for cutting cast & extruded acrylic sheet on your Glowforge. If I am going to frame the piece, this allows me to cut it out later. Load the file to your Laser Engraver and add settings below Do Not Mask!1000/30/270 vary power. It sounds like you're having an issue called flashback. To create our sharpening effect, we will again click our source image layer, go to the menu and perform Filter > Sharpen > Smart Sharpen. Looks like you already have an account! Any special recommendations for specialty acrylics like those? Laser engraved photos are some of the most popular products in the laser engraving industry, but the process of image engraving adds more variables into play, making the process more complex. Annoying! Take full advantage of our site features by enabling JavaScript. Filter > Sharpen > Unsharp Mask This file is a joke, nothing but the image shown including the frame which is just a picture of a frame. Very informative tutorial. Picture engraving on unusual materials requires extra trial and error all part of the learning curve and enjoyment of using a, While most laser users begin with engraving text or logos, photo engraving on stone is an advanced technique that any professional or DIY laser engraver should acquire. The example that I have chosen for this article has plenty of detail, no large areas of a single color, and some subtle shading that should make a good subject. This example of Rio has a little bit of all colors (which is why I picked it - besides him being a pretty good lookin' pup). Based on our own process of trial and error, weve come up with the ideal step-by-step process for preparing your chosen image for laser engraving. Whatever you choose, remember that the most important point is to start off with a clear, high-resolution image. The way you edit your photo and the engraving material you choose (the ingredients), must come together with the right engraving settings such as power, speed, and resolution (the cook-time and temperature). Amount: 200 % Radius: 1 pixels Threshold: 0 levels. I recommend checking at each extremity of your image engraving. Once you know the best settings for your laser engraver, you can repeat these techniques time and time again to create beautiful photo engraved gifts. Send me exclusive offers, unique gift ideas, and personalized tips for shopping and selling on Etsy. It can also have very sharp edges, handle carefully! Digital file type(s): 1 JPG, 1 PDF, 1 PNG, 1 other file. A postage-stamp picture that you scanned out of an old photo album will not maintain its clarity through the transformations that need to happen before the image is ready to engrave, and you wont be able to inflate or blow-up the picture like in the CSI television show. For example, if processing an image in this way for a Trotec Laser System, I would recommend not using the Photo Optimized mode. Light hair strands create more light. I was lucky enough to find a local cottage, close to my workshop in rural France, that was being renovated, and they were giving away their old roof tiles these had been weathered on the roof for well over 100 years. Your email address will not be published. Copyright @ Hai Tech Lasers, Inc. 2017 All Rights Reserved. If you don't have a subscription to Photoshop yet, the plan to get is the Photographers Package, which includes Lightroom and Photoshop for $9.99/month - definitely the best deal! One thing is for absolute - you do not want it to be less than the resolution than you are engraving it at! A quick fix may be cutting mirror FACE DOWN, with the grey side up. In fact, it sometimes seems like despite it being one of the most popular laser cutting ideas and Glowforge projects, there is a fair amount ofthe unknown surrounding the topic. Great question! These are third party technologies used for things like interest based Etsy ads. I did. By increasing the green slider, I can push the green foliage up so that it will engrave lighter. We can embed the image into an SVG or PDF file in those programs, where it will save and respect the resolution. Acrylic is one of the best materials you can experiment with on your laser. Copyright 2022 . I have a laser engraver I just finished putting together.
Look closely at the image on a newspaper, and you will see it is made up of tiny dots because newspaper printers only use black ink. Set the Black to 3-6% to help these areas stand out better. How to Laser Engrave Photos on Slate Stone, Lay the piece of test slate on the bed and check the, Photo Engraving: How to Laser Engrave Photos on Slate Stone. It also could be a result of the power setting - alternatively, the flashback is affecting your iridescent material more than other types of material. If you're interested, check out my Photoshop Actions - which do all of these steps with pretty much the click of a button - and a lot more. Not every photo will laser engrave well. Laser engraving produces grayscale images naturally by cutting different lines at different depths for different numbers of passes. Then, we will right-click on this layer and make it a "Smart Object.". After engraving, wipe product with damp sponge to remove the soot and dust. Color indexing is a tool that some imaging software has which can re-draw your photo with a fixed number of colors for maximum contrast. By increasing these values, I get more detail out of his dark coat. When the laser beam hits it, it cuts into, or ablates the surface, it has either an engraved or non-engraved finish, not a variation in-between. Many users learn how to laser engrave a photo onto a specific material and stick with that same material until they have mastered it. A great picture is a great starting point for producing something fantastic with our, Diode Pumped Laser Marking System, Nd:YAG, Laser Marking for Aerospace Applications eBook. Also, this is one of the few situations where speed has less impact on the final image compared to engraving other materials. The natural finish of slate enhances the photo, and if you are fortunate enough to find a source of free slate tiles, then even better! Delvie's Plastics, Inc. Material - All 1/16" (0.06")Thick Acrylic, Material:All 1/8" (0.120") Thick Acrylic, Material:All 3/16" (0.177") Thick Acrylic, Material: All 1/4" (0.230") Thick Acrylic, Acrylic Balls & Half Round Balls (Cabochons), Thunder Nova Laser Engraver Acrylic Settings, Universal Laser Systems Acrylic Cutting Settings, 133 West Haven Ave. Salt Lake City, UT 84115. I make sure that my "resample box" is checked, as well as the "anchor link" between the width and height (this keeps the image from getting all stretched out funny). We take intellectual property concerns very seriously, but many of these problems can be resolved directly by the parties involved. You can also glue a sawtooth hanger to the back and hang them. This isapotent tool that can extract a lot of detail from both the shadows and highlight regions of your photos. After converting the image to black and white, the photo will have 256 shades of grey, producing the subtle variations used to create shadows and details. However, when the slate is hit with the laser beam and ablated, the result is a light grey, and the untouched areas remain dark grey. Star Seller. Set parameters for engrave But those imperfections make it a wonderful substrate for. Be careful where black or white parts might merge together and lose the definition between them. :). Yes! Choose a photo that has plenty of detail and no large areas of a single color. It's a little more complex than that, but we're not trying to write a book about Photoshop here - just how to laser engrave your image! Etsy keeps your payment information secure. Output: 200 pixels/cm (508 pixels/inch) Thanks for any help. Etsy shops never receive your credit card information. I use Adobe Photoshop, but much of the process can be adapted to other programs likeAffinity Photo(which has many of the same tools as Photoshop) andGimp. Speed and power must be chosen by experimentation. can you send the setting Laser engraving photo video learning, We will make video tutorial about Laser engraving photo, Hello, thank you for sharing this engraving method with others, I have a RUIDA controller, thats why I really liked the final work you get with a similar machine, I think your work is fantastic, so I think it would help a lot to have some Additional guideline from photoshopped photo setup work. The iridescent does come with a film masking, however, you might have better luck adding some additional paper masking (on the side that will be placed face down on the laser bed) to your sheet before cutting. To overcome this issue, we use dithering. You will probably have seen this in newspapers. Ad from shop TNALaser To edit the highlights and shadows for Rio, I did the following: Shadows: Amount: 15% (the total correct desired, or how much I'm going to push the shadows up)Tone: 24% (how broad of a range in the shadows I want to be selected - a higher percentage increases the number of dark areas affected)Radius: 28 pixels (determines how large of a radius in pixels is affected by the adjustment)Highlights:Amount: 14%Tone: 50%Radius: 30 pixels. What software should I use to prepare a photo/image for laser engraving? The middle slider controls the mid-tones, and the right slider controls the brightness in the highlights of the image. Is it the same as 200px that you have specified for the image resolution? To adjust how these colors are mixed, double click the layer thumbnail, which is the small square that is black and transparent. It's important to remember to mirror your graphic of course! You can buy a plate stand at any dollar store. While most laser users begin with engraving text or logos, photo engraving on stone is an advanced technique that any professional or DIY laser engraver should acquire. I don't like this. However, some materials, such as slate in our case, do not always behave well for photo engraving. If we were to photo engrave a piece of wood, the wood would char and turn brown or black, so we would see the engraved image appearing as black dots perfect! The resolution is a debatable topic.
Set the Black to 10-15% for optimal results. By assigning each copy its own color in Lightburn, we can adjust the power settings for each image and test engrave the result. Here's an example of how Rio changes when I modify how the color Red is mixed. I really need a step by step instruction if you have a video that specifically writes out the website and is user friendly. Your CO2 Laser will have a laser head that can accept focal lenses of various focal lengths. Not every image lends itself to laser engraving so you need to pick one that will. . Parameters for 40 watt power laser (Program: RDCAM) This is part of what my actions do. Make sharper eye, eyelashes, eyebrows, lips, hair using Sharpen Tool. Great! If you're here, you probably have a Glowforge project in mind for engraving a picture and are wondering the best way to do it. The last and most fun step is always setting up the options on the laser cutter and finally pressing go after youve done all the hard work. There are a number of steps required to prepare an image for laser engraving so lets step through them one by one. Increasing the slider value lightens the colors that have red in them. By making the background of the image plain white, the laser machine only engraves the focal object and you avoid obscuring the object with irrelevant background details that you dont want. Start by resizing the image down to 20mm wide and duplicate it a few times.
When using the settings below, keep in mind that dirty lenses and mirrors can decrease power, affecting the quality of your cuts. that automated the process of putting all of my tools into one place, made some pretty good guesses at the edits needed, and allowed all of the customizations I wanted and needed. It's inexpensive, and with thousands of combinations of thicknesses, colors, and sizes of acrylic to choose from, the creative possibilities are endless. This step is important and may require use of the cutting tool in your image processing software, or some handy Photoshop skills. Going through each color available in the mix, you can modify the image to your liking. Open your original image and copy these settings across to it. United States | English (US) | $ (USD), Glowforge Digital Laser Ready Design File - Painted Acrylic Lion- Acrylic Engrave File - SVG - PNG -PDF - Wildlife - Big Cat - Jungle Cat -, Glowforge Digital Laser Ready Design File - Eagle We The People American Flag - Wood Engrave File- SVG - PDF - PNG - America - 2nd Amendment, Copyright and Intellectual Property Policy, Review how we define handmade, vintage and supplies, See a list of prohibited items and materials, remembering account, browser, and regional preferences, remembering privacy and security settings, personalized search, content, and recommendations, helping sellers understand their audience, showing relevant, targeted ads on and off Etsy. Decreasing the slider value darkens the colors that have red in them. We want to scale it down and increase the pixels per inch to get to a final engravable image. Make a white background, merge layers (Ctrl+E). They dont have different shades of grey inks, so dithering creates the illusion of greys, dark, and shades. While other methods of picture engraving exist, you can use a laser engraver to engrave photos on wood, acrylic, glass, and other, How to prepare an image for laser engraving, How to convert a photo for laser engraving images, Step 3: Consider the material being engraved - dithering. The toolsdo have different names in different programs, but they are generally close enough that you can figure it out. Interval(mm): 0.05. If you find this editing process of value but get tired of running through the motions, consider checking out the Photoshop actions. You want to try and maximize the contrast in key areas of the photo.
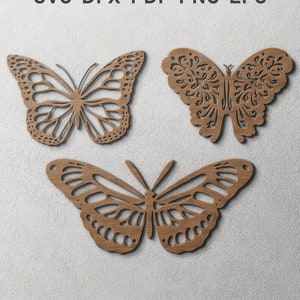
Caption: This image is an excellent candidate to become a laser engraved portrait. You dont have to be a graphics wizard either in fact, it doesnt really matter what program you use, as long as it can perform the basic functions we outlined above. Whether you're just beginning to experiment with your machine, or you've been creating for years, the cutting chart below can serve as a handy reference when cutting acrylic on your Glowforge laser. For photographs of people, sharpen areas like the eyelashes, lips, hair around the face, and anywhere else that you would like to emphasize in the final engraved image. Slate tile roofs are also quite common along the East Coast of the United States. The last and most fun step is always setting up the options on the laser cutter and finally pressing go after youve done all the hard work. The image was processed in Lightroom, and the settings chosen can be seen in the screenshot. When imported, it will come in too big and will need to be scaled back down. Cut out the parts of the image that you dont need and resize whats left to the dimensions that you want it to appear on the stainless steel or other material youre using. Based on our own process of trial and error, weve come up with the ideal step-by-step process for preparing your chosen image for laser engraving. The actions pay for themselves in a little as 1 or 2 engraves. Use photo only excellent quality. I want to tell you how we engrave photos on a laser machine. My sister loved her picture nice detail in the design. Our galvanometer laser systems are so precise that, beyond engraving words and phrases, youll actually be able to engrave photo-realistic images into stainless steel. Some say High speed low power and other sites say the opposite.
glowforge It was well-built, sturdy, and has more than enough power to cut through 1/4 MDF, and yet is delicate enough to engrave cardstock. Who wants a picture of an engraved frame? With the mirror, this can cause the 'grey backing' to become burned. Slate can be a little uneven, so you may find a magnet or two will prevent it from rocking or moving. Find out more in our Cookies & Similar Technologies Policy. Sharpening just makes lines look bolder, and its a simple tool thats present in virtually all photo editing programs. The example that I have chosen for this article has plenty of detail, no large areas of a single color, and some subtle shading that should make a good subject.

Photographers that are engraving photos will hate this step. Each dot will be just one color that of engraved slate. This seller consistently earned 5-star reviews, shipped on time, and replied quickly to any messages they received. I don't accept returns, exchanges, or cancellations. After thoroughly drying, it was sprayed with a coat of acrylic mat varnish to seal the surface I find that this helps develop more clarity in the final engraved image. PDF 5.2"x8"Paint one side of clear acrylic BLACK. The first thing you should do is contact the seller directly. Despite this being written for a Glowforge, I use this process everyday for photo engraving with both my Trotec Speedy 400 and Universal Laser Systems VLS460. Slate can be purchased as pre-cut pieces from kitchen stores as coasters and placemats, all of which can be laser photo engraved. The intensity of black color on face should be 10-15%. Whenever starting with a new material, I highly recommend performing a test engrave. Our compact 40W Desktop Laser Engravers produce flawless engravings. You may start off with a broader range of powers, but then once you know the ballpark settings, you can fine-tune - in my case, I chose 18%, 16%, 14%, and 12% power at 250mm/s. How should I prepare images for laser engraving? The photo is now almost ready for laser engraving, but a couple of techniques can be used to make it engrave even better. This ensures that your image will appear in high resolution on the material youve chosen. I have no idea what speed or power to use and how many passes. The laser will now photo engrave your test images at each of the layer settings, and when complete, you can examine them., Typically you should see an improvement in the image quality as the power changes, and you will then decide what the ideal settings are. Create a shadows and highlights smart layer. Its a 3000MW Blue CNC. Choosing a selection results in a full page refresh. We can write a whole new article about dithering for photo engraving and the differences between various algorithms, but suffice it to say that each alternative introduces randomness to the dots to improve the final image depending upon what type of image we are working with.. When I cut iridescent and mirrored acrylic with my glowforge I have issues with the back of my sheets burning along the edges of certain cuts using these settings. Carton, paper, plywood, wood vector templates for die cut and laser cut. If youre not about to get into editing your photo, theres an option you can choose to help maximize the contrast without having to do any complex changes on your own that tool is color indexing. Much like the Instant Pot recipe you may be looking up next because you need an easy meal for the family since you're so busy lasering, laser engraving photos is a lot like a recipe and making a dish. This is how you make Glowforge projects make money. Slate is a naturally formed rock (and therefore very eco-friendly) that was created over 500 million years ago from compressed clays and volcanic ash. We've sent you an email to confirm your subscription. While other methods of picture engraving exist, you can use a laser engraver to engrave photos on wood, acrylic, glass, and other materials like slate stone. Resize your image to the desired engrave size. Glowforge ready acrylic engrave ONLY!Lion Acrylic Engrave.You will not get the backer board with this file1. If we were to photo engrave a piece of wood, the wood would char and turn brown or black, so we would see the engraved image appearing as black dots perfect! I would like it deep enough to paint the engraved area with a paint pen. Large dark areas of photos light. Create a new Black and White adjustment layer. The image on the left shows the red slider at 0. Remember that we are burning dots in the dithered image and so set the min power to 0 and only adjust max power. These settings allowed me to pull the highlights down, creating a lot of texture and detail in the white areas of his coat. These can be applied to photos of people, places, or objects. PNG file Adjustable Size2. It required a scrub and light sanding with 800 grit waterproof paper. Yes we do custom orders. Convert the photo into a dither pattern consisting of millions of tiny dots. I tend to like values around what is depicted in the below screenshot. Try using a different browser or disabling ad blockers.

For comparison, here is what we started with and what we ended with: If this seems like a fair amount of work, well, it is. Now some materials, such as wood, are very good for laser engraving images (burned) at various power levels so that the laser can create light and dark shades by adjusting the power as it moves across the wood. Thanks. Now that were looking at something similar to what the laser engraver will produce, we can start making any editions that are important for achieving the desired outcome. We will click onour source image layer to select it, then go to Image > Adjustments > Shadow / Highlights. You dont have to be a graphics wizard either in fact, it doesnt really matter what program you use, as long as it can perform the basic functions we outlined above. Too much air will blast any smoke particles or debris back onto the slate, contaminating the photo engraving. After thoroughly drying, it was sprayed with a coat of, Photo engraving refers to the process of engraving vivid images onto various materials. Another thing that I figured out with my actions was how to save the image as a PDF that respected the Pixels Per Inch (PPI / Resolution) value that I set earlier. I was lucky enough to find a local cottage, close to my workshop in rural France, that was being renovated, and they were giving away their old roof tiles these had been weathered on the roof for well over 100 years. Laser engraving is a diverse application it can be used to mark medical devices or aftermarket automobile parts that will withstand the toughest conditions, or to commemorate a birthday or special event by marking the date on a keepsake item. Hello, what is the dpi that you are using? Whatever you choose, remember that the most important point is to start off with a clear, high-resolution image. Saying no will not stop you from seeing Etsy ads or impact Etsy's own personalization technologies, but it may make the ads you see less relevant or more repetitive. Every image doesn't need this level of attention, but a lot do. But please contact me if you have any problems with your order. For light hair strands, you can make them a bit lighter. When exporting to bitmap, a recommended resolution is around 200 pixels per centimeter.
Eye the best choice.

I am going to take you on awalkthrough of the process involved in editing a photo for engraving on your laser and knocking that Glowforge project out of the sky. How can I make sure that my image engraves well on stainless steel? This typically means making the whites whiter and the dark areas darker. It felt like a personal version of that movie, Groundhog Day. This helped to "push" the shadows up. For our slate photo engraving, we will use the same technique. Now, confirm that your cooling water temperature is between 6070F (1621C), the air extraction fan is running, the laser PSU is on and the lid is closed and you can hit the start button in LightBurn. The eyes should be almost white. Dark hair strands darken.
glowforge undoubtedly machine paperflodesigns But, it's also the best way to get edits specific to your image and not just good guesses. Etsy uses cookies and similar technologies to give you a better experience, enabling things like: Detailed information can be found in Etsys Cookies & Similar Technologies Policy and our Privacy Policy. When I wanted to make a change, I'd have to start over because the edits had already been committed to the source image. Depth: 1 Bit, Cut a piece of image for tests. Remember to tell Lightburn that you want this inverted by clicking the appropriate button. One of the coolest applications weve seen for laser engravers involves working with real life-like photographs and images.