Not sure, Id have to contact the right people.
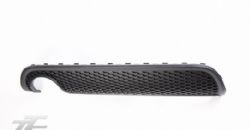
tt audi rear v6 single exit valance TIP: the pegs are 2 stage then they drop out which you don't
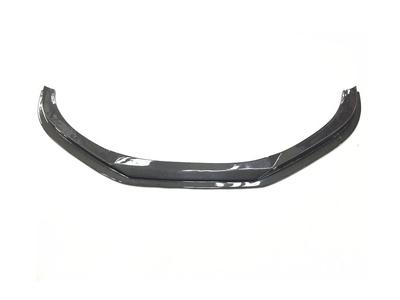
want to happen.. Use a small rod but hold your finger tight
against the rod around 5mm back, when you push the peg let your finger be the
stop point to avoid the peg dropping into the engine bay. 9 Bumper

13 Expanding clip Flat bottom Steering Wheel with active controls on a MK1TT?? Wow awesome article Andre. 12 Guide profile
8p airbag pratiques Remove the 2 large Philips screws from the
lower front bumper. Removing:
His work has appeared on various websites. Detach before removing trim -1- b) Unscrew Torx bolts -2- (13x). Mine is scratched up and If I could just buy the lens, I can replace my old one using your instruction. 17 Combi bolt: 2.5 Nm. Do you have to remove the bumper when removing the factory intercooler? I would use Waks guide as the primary guide and use the two other ones if questions occur. VerticalScope Inc., 111 Peter Street, Suite 600, Toronto, Ontario, M5V 2H1, Canada, vwvortex.com is an independent Volkswagen enthusiast website owned and operated by VerticalScope Inc.
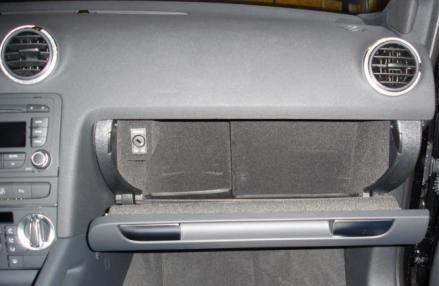
tt linings pillar It's an 04 8N 3.2. Park the Audi TT on a level surface and set the parking brake.
Remove the Front Wheelhousing Liner document.getElementById( "ak_js_1" ).setAttribute( "value", ( new Date() ).getTime() ); Enter your email address to subscribe to this blog and receive notifications of new posts by email.
diffuser 8n gru tt bumper audi genuine lower rear 3 Lateral adjustment screw, Turn adjustment screws to achieve specification.
5 Securing nut: Hold nut with open-ended spanner when tightening combi bolt -4-
I then sanded down the surrounding area, taped behind the holes to prevent the filler to run through and then filled in all the holes with a flexible plastic epoxy. Detach trim toward the front. Looking good Tony and glad you found someone who met your (high) standards! Absolutely! I am 100% sure you will be able to do it, following these guides. Advertising -
Hi Andre, Do Not Sell My Personal Information -, By logging into your account, you agree to our. Everything from Audi always recommends removing the tires. Install in reverse order of removal, noting the following: There are 2 10mm bolts either side, 1 is
accessible from the top half of a chamber, the other from the lower chamber,
loosen and remove these bolts. Tighten hexagon collar nut -1- to 6 Nm. Do Not Sell My Personal Information -, By logging into your account, you agree to our. Archive -
3. problem is, ive never removed a bumper on a TT and im having a little trouble ive gotten all the torx bolts out that i can see and the ones in the wheel well but it seems like there is something still attached, maybe im missing something. There are lg torx screws under there. It's better off to order the US spec bumpers from the dealer yeah i had the tumors i took them off right away! a) Remove front wheel before removing wheelhousing liner Trim -1- and bumper -5- removed The following errors occurred with your submission, Discussion forum for the Mk1 Audi TT Coupe & Roadster produced from 2000-2006, The New Marketplace (All new FS items go in here), Vehicles For Sale - Archive (NO NEW POSTS HERE), Parts For Sale - Archive (NO NEW POSTS HERE), Want To Buy - Archive (NO NEW POSTS HERE). 1 Pressing in expanding clips Fill in your details below or click an icon to log in: You are commenting using your WordPress.com account. 3 Combi screw: 6 Nm Do Not Sell My Personal Information -, By logging into your account, you agree to our. 6 Cross-head bolt: To this day, I still havent found any supplier for the lenses. Disconnect the cover on the top of the water bottle near the front of the engine compartment by hand. They are from Bentley Publishers. 14 Self-tapping screw: 1.5 Nm Did you find the answer yet? I'm hoping to get a rear telson spoiler to add more black to the color scheme. Remove the Front Bumper 2nd gen. A3 - (Typ 8P/8PA, 2003present), Q5 Bumper Removal, S-Line Grille installation on standard bumper, WTB: ASAP 99/00 A4 or S4 front bumper and rear bumper, DIY- Custom bumper LEDs for my Canadian friends, FT: B6 A4 non s-line bumper + Cash for your USP bumper. 2 Detaching wheel spoiler algum membro sabe como retirar o esguincho lava farois audi tt? Before detaching trim -1-, loosen screws so that retainers on guide profile -13- disengage from trim. I see. Installing. A forum community dedicated to all Volkswagen owners and enthusiasts. Thanks Dubspeed. Remove screws -17- at bottom of trim from noise insulation. Detach hose at connecting piece on vehicles with headlight washers. The Powertrack Insert; The best way to improve your Haldex first generation traction! :thumb: A forum community dedicated to UK-based automotive detailing enthusiasts.
If guide profile is not loosened, trim cannot disengage from retainers, and paintwork may be damaged. 11 Hexagon nut with collar: 6 Nm Disconnect battery the bottom two holes line up with ones already in the front bumper but in order to get the top two in i need to take the bumper off and drill 2 new holes. Take the plastic cover off the front of the vehicle by hand and locate the six Torx bolts on the front bumper. Remove the Front Bumper There are two screws under the bumper, a row of torx across the top edge and the four wheel well nuts. Fig. 2. From the WAK-TT website for the 8N Mk1 model: Thought I would upload a couple of quick photo's taken of the completion of the thread I started. any help would greatly be appreciated.. thanxxx.

Self-adhesive, glued onto wheelhousing liner, 2. Tighten all screws -arrows-. Removing headlights you can remove the tumors.. it leaves about 30 holes in the bumper that need to be filled. Only accessible after removal of wheel housing liner but its about the middle of the bumper and on either side of where the grill is. I've got mine down to about 15-20mins now and I also find that its much easier to re-align once it's been off a few times. Adjustment screws on left headlight shown. c) Disengage wheelhousing liner from fender and pull it out downward. thank you for the post.can i transfer my 2002 TT Xenon hardware and place them into a 2002 halogen headlight assembly? Is there any way of taking off the "tumors" from the canadian front and rear bumpers? so what your saying is.if i wanted a right hand drive tt, i should import it to canada, register it there, then bring it to the us for registration? I started by breaking all the clips from the inside of the bumpers. Detach front part of wheel housing liner about how long does it take to remove the front bumper and how hard is it to reassemble? 4 Combi bolt: 35 Nm Cookie Policy -
The front bumper can be removed without too much trouble, allowing you to customize the appearance of the TT to fit your individual style. I still won't give up my hope for angel eyes installation then. Andre, Do you have a section or link for simple schematic on how everything is powered Loosen screw -3-. Engage mounting pin -1- in retainer -2-. Privacy Statement -
4. Come join the discussion about performance, builds, modifications, classifieds, troubleshooting, maintenance, new releases, and more! Remove the Torx screws with a Torx screwdriver and lift the front bumper off the Audi TT, setting it aside. I did my front when I got a body kit, but didn't do the rear, as it looks fine imo. Always set the emergency brake of the Audi TT before attempting to remove the front bumper to prevent the vehicle from moving. Pingback: algum membro sabe como retirar o esguincho lava farois audi tt? My lenses are bad and I can get a new set cheap but a stated the new assemblies were bought for halogen bulbs. Detach the battery cover on the driver's side of the engine compartment near the front, removing the plastic pegs with a flat-head screwdriver.
Trim -1- engages in side of guide profile Bumper Removal
Bumper Removal
Big Pics - Bumper Removal
PDF
Tools:- Jack, Axel stands Wheel brace &
Torque wrench (120nm), Full range of Torx bits, Large Philips driver, long reach
10mm socket driver, Pipe clamp for alien pipe if needed. How to create your own 5 or 6-speed Open MetalShifter. TIP: Once the pegs are pushed, use 2 flat tools to lever the head and entire peg
body out, as they are under tension, they could pop out, make sure a thumb or
finger is stopping them to catch them before they fly off and disappear into the
engine bay. To enable trim -1- to engage upon installation, press guide profile upward as far as it will go and tighten screws -10-. To detach wheel housing liner, release quick-release fasteners -arrow B-. I don't remove the wheels to pull the bumper, just undo the front halfs of both the wheel liners, then crank the wheels all the way to one side, undo the wheel well nuts on one side and then turn the wheels the other way to get access to the other side. Copyright 2022 Leaf Group Ltd. / Leaf Group Media. So this install cancels the fog lamps, but the LED lights replace their lighting power! Advertising -
If ever you find one, let me know! There are a number of front bumper designs for you to choose from to enhance the appearance of your car. 1 Not applicable Thanks for the info. I did it myself, the tumors are punched into the bumpers and held by clips. FYI, the DRLs are powered from the fog lamps. How do you remove the plastic fender from the bumper itself. (LogOut/ Archive -
7 Hexagon bolt: 35 Nm
2 Securing strip
You can save time and money by removing the front bumper yourself. 1 Front wheelhousing liner Adjusthing the headlights. Contact Us -
theyre fantastic! Unscrew Torx screws -arrow A- and 2 screws from underside. Release quick-release fasteners on wheel housing liners and noise insulation (FIG2) For a better experience, please enable JavaScript in your browser before proceeding. The process is quite long for the DIY guy that is at his first try. To remove, unscrew bolts -7- and pull bracket out of longitudinal member Unscrew when removing bracket -8- Cookie Policy -
CAUTION! Detach trim toward the front. might as well get something else, since you have to paint the bumper anyway. For pre-assembly Slide headlight towards radiator in order to disengage mounting pin -1- from retainer -2-. Every year of the MK1 TT; 1998-2006. Those may be where you're having your problem. The door inserts aren't supposed to come flush but do help come closer to the edge. Reconnect battery, Tightening torque: Headlight housing to lock carrier: 6.5 Nm, Special tools, testers and auxiliary items needed : VAS 5107 Optical headlight aimer. I got a new grill w 4 tabs, which take screws through them. Content on vwvortex.com is generated by its users. Besides the time savings, I like leaving the wheels on b/c I lean on the wheel while I am contorting my arm to undo the nuts and I also get sketchy about working under a car on jacks/stands. Unfasten the two screws underneath the front bumper with a Phillips screwdriver. Terms of Service -
Note: Clips must be pressed into fender before installing bumper (FIG1) Remove the entire plastic cover across the
front of the car, you will then have access to the 6 Torx screws at the front
holding the bumper.remove them, slide off the metal clamping strip and put it
to one side. Remove screws -arrows-. Remove headlight housing from opening. Open engine hood. Connect electrical connections. To remove, unscrew combi bolt -4- and detach bumper Great HOw to by the way with links and headlight removal.. Disconnect electrical connections.
JavaScript is disabled. 8N0941 004 AQ Great source of repair manuals. Audi TT Mk1 8n Tuning Parts & Accessories, Audi TT Performance Parts for sale (mk1 /8n), Audi TT LED (R8 LED Daytime Running Lights unlike POGEARACING), DMC Concept North America (Canada & USA) Tuning for yourAudi, Audi TT Tuning: Aesthetics AftermarketAccessories, Audi TT Suspension Performance: Control Arm Solution: DefconBushes, For Sale: 2002 2L 462 Bhp Jabbasport Audi TT(UK), How to remove the headlights of an Audi TTMK1, Waks Eclipse Lights & Clear/Smoke Corner Fitting. Born and raised in California, Pruit attended Contra Costa Community College in San Pablo, Calif. and received an associate degree in the administration of justice. Remove front bumper trim Carl Pruit has been a freelance writer since 2005, specializing in service journalism and travel. It is possible to just purchase the lens somewhere. Whats powering the DRL, is there wires being tapped etc.. Also, angel eyes, where is the power drawn? Contact Us -
10 Screws: 1.5 Nm The following errors occurred with your submission, http://public.fotki.com/mcphill/audiff/angel_eyes/. The front bumper of the Audi TT is connected to the front of the vehicle frame with screws and bolts that can be removed in about a half hour. Steering Wheel Swap on my Audi TT / Flat Bottom Mk2 fitted on a Mk1, Haldex Controller Update: Blue - Orange - Silver Controllers, Audi TT Control Arms Solution: Defcon Bushes. Audi Forum - Audi Forums for the A4, S4, TT, A3, A6 and more! Lift up the front end of the vehicle with a floor jack and place two jack stands, one next to each front tire under the front axle. Remove screws -14- and -16-, then detach wheel spoiler -15-. 2 Height adjustment screw one question though where did you get the diagrams? Before installing trim -4-, it is necessary to press clips -2- into fender -3-. Cheers Alan, appreciate your time given to reply. seeking any advice on removal of the lower rear bumper panel along with the front bumper-grill on a TT. NO more tumors! The Fora platform includes forum software by XenForo, http://forums.audiworld.com/tt/msgs/1666083.phtml. Remove screws -3- and take off securing strip -2-. It's my daily run around and makes no sense to sell it. thanks, do you have an exploded view of that diagram or maybe a link where i can see it a little bigger? For a better experience, please enable JavaScript in your browser before proceeding. Below is a picture of the bumper pulled out
to show you, just inside the wing there is a single torx screw facing vertically
down which must be released. Since the two first removal guides are links, you will find Bentleys guide below. Unscrew nuts -11- from inner side of wheel housing. It can be taken off, take it to a body shop to have the holes filled and repainted. Question: What is the difference between the following TT head light part numbers: Remove the indicated Torx Screws to release the front of the
wheel arch liner and push it to one side to allow access to the chamber behind
the bumper. Detach the two bolts---one on each side---in front of the tires in the wheel wells with a socket wrench. Is there any thing involved in realigning the bumper to the body so it fits straight? An extension is helpful reaching the 10mm nuts (2 10mm nuts on each).
TIP: If your car is too low for a trolley
jack, drive onto a piece of thick wood to give you height for the jack. Manage Preferences -
JavaScript is disabled. Cookie Policy -
But when you purchase the DRLs, you do get a complete install guide. Hey guys, I have done this on my TT.. it requires a lot of work.. removing about 30 'rivets' and then filling the holes and re-paint.. it would be probably cheaper to find US spec bumpers and replace them.. Privacy Statement -
If alignment is necessary, proceed as follows:
Remove the Battery Cover and all six pegs
holding the front cross member cover panel in.
cyl 8l Terms of Service -
Change), You are commenting using your Twitter account. Thanks for the blog. 8N0941 004 S I had a 53 plate years ago and swapped the center lower bumper trim for a V6 version (honeycombe pattern) - i think it had 2 plastic fixings (push the centres in and out they pop) then swivelled outwards and pulled backwards to release tabs along the top.

Change). Archive -
15 Wheel spoiler 5 Seal Privacy Statement -
So in this post, you will find 3 instruction guides. 5 Pimp My Ride ideas you should avoid doing to your AudiTT, Audi TT Tuning: Aesthetics Aftermarket Accessories, How to create your own 5 or 6-speed Open Metal Shifter, Haldex Service Training - Self Study Program. 16 Self-tapping screw: 1.5 Nm Fig. The Fora platform includes forum software by XenForo, Pre-wash stages: Washing, Drying, Clay & Detailing, VerticalScope Inc., 111 Peter Street, Suite 600, Toronto, Ontario, M5V 2H1, Canada. 8N0941 004 AS.
8n mk1 insert 8 Bracket Lower the vehicle so it is resting on the jack stands. Manage Preferences -
Change), You are commenting using your Facebook account. If you find out please let me know, I would love to remove mine as it looks like s%^t! Jack up the car and remove the front wheels, Use axel stands
for safety.
tt audi fiber carbon mk3 8s fv spoiler quattro bumper lip door type Removing the tires makes the job easier, but it"s not necessary. vwvortex.com is not in any way affiliated with Volkswagen AG. Pull the bumper down carefully and locate the Torx screws inside the ends of the bumper. Come join the discussion about methods, materials, equipment, restoration, classifieds, troubleshooting, and more!
b) Jeff Bipes Angel Eyes fitment guide (Step by Step IMAGES ONLY) Finally, sanded as best as i could and brought it to the body shop for paint. c) Bentleys Repair Manual Headlight Removing Guide. (LogOut/ Since many of you ordered the LED DRLs, I have often been asked forcomplete instructions on how to remove the front headlights and how to break them apart. Loosen screws -10- and press guide profile -12- slightly downward. Turn adjuster -2- as necessary to bring headlight housing in alignment with bumper trim. would anyone like to know how a 180 FWD tiptronic drives? Terms of Service -
Contact Us -
(LogOut/ Unfortunately, I do cannot publish this information for competitive reasons. They just add that little bit of flare and i'm sure they'll look good with votex sides. a) Waks Eclipse Lights & Clear/Smoke Corner Fitting (Step by Step Instructions with Images) TIP: get an empty plastic box or tray to collect your screws as you go along. Plug & Play comfort blinkers on a MK1 TT, yes itspossible! Currently Active Users Viewing This Thread: 1, The following errors occurred with your submission.
Disconnect the Torx bolts with a Torx bit and socket wrench. Trim -1- removed My Audi TT Mk1 8N Tuning Project galement en Franais. Arrangement on right headlight is mirror image. If guide profile is not loosened, trim cannot disengage from retainers, and paintwork may be damaged. Place a wood block behind the rear tire to prevent the vehicle from rolling. Detach hose at connecting piece on vehicles with headlight washers. Basement cleaning I found a brand new DMC RoofSpoiler! 55K Km. Install screws -arrows- and hand-tighten only. Front bumper, removing, installing and assembly overview. How about tools, like is there any torx or other non common tools needed to do this? Expanding clips must be pressed into fender before installing trim -1- (FIG1) Here it goes: 1. Install front bumper trim, Check headlight housing alignment with bumper trim. Access to the bumper cover nuts can be acheived by turning each tire as you work. There are 4-10mm nuts that require a deep socket and long extension to remove.