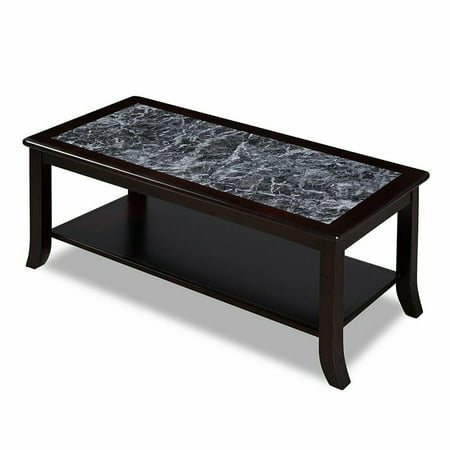
Luckily for us, the Mandarin Stone tiles (which were gifted btw!) Next, I spray painted the entire new base and new legs gold with Design Master Gold Medal, two coats. Do you see the different between the left and right side? document.getElementById( "ak_js_1" ).setAttribute( "value", ( new Date() ).getTime() ); This site uses Akismet to reduce spam. And of course, you can do as much or as little veining as you want. Here you can see the difference between the buried vein on the bottom, and the rest of the gray veins that hadnt been softened and buried with the white paint yet. I hope youll join me on my DIY and decorating journey! Where did you get all of that unbelievable talent? I pounced and dabbed and brushed and swirled until the two colors had mixed enough to create a soft background with color variation. Lines. Note that these screws are not included in the kit. I created a watered down paint mix using the colors above. I wasnt surprised when you said that it belong to an elderly woman as marble typically makes me think elderly. Interested in where it will end up. From the arched built-in, to the arched headboard, to the beautiful midcentury modern chair (a Pierre Jeanneret Kangaroo inspired remake) and pole wrap wood walls .. there is so much to love about this room. 5. I also used the large, soft watercolor brush to soften the look. You may find these at your local hardware stores (Home Depot, Lowes) depending on availability. A couple of months ago, I purchased a new coffee table for the living room. Thats amazing, Kristi! Required fields are marked *. The key when creating veins with a brush is to be messy. It looks so much like this $600 coffee table from West Elm, but it cost me less than $50 for contact paper and all. 2. gold. And DIY gifts can go as far as stone remnant refurbished furniture gifts like this project. Slip a stretcher over the connector on each leg, butt it tightly to the adjoining surface, and tighten the setscrews. If I could use one of your photos (not cropping or editing of course) that would be great too <3. Thank you! Your email address will not be published. I never tire of seeing what you come up with! Cut each leg and stretcher slightly oversize and smooth each cut end, bringing the leg to finished dimension. Expensive. Matt has M.S. I took the glass top out of the coffee table first and laid it on the floor. Wow, the results are SO MUCH MORE than the ingredient list! tag me, friends!, All Rights Reserved It may be my favorite room in the house! After the epoxy has cured, slide down the right-angle mounting clip on each leg and butt it firmly to the plywood mounting block; tighten the setscrew. We smoothed the cut end using a big Delta disc sander with its miter gauge clamped in position. I actually still love a good herringbone wood floor! This table is just beautiful and I learned so much more of how to do this from you!! What do you think? The challenge is getting it to look like a real marble that I actually like, because I can be a little picky. That turned out so beautiful! Complete the base by assembling the legs, stretchers and mounting clips for the top. for a previous project that I didnt finish. (Bookcases, Daybed, and Trundle Bed), And The Winning Living Room Paint Color Is, Finalizing Our Master Bathroom Floor Plan & Design. The fluted coffee table of my dreams I wish I had that much talent. The base is made from fractional 15 Series smooth T-slotted aluminum, an extruded material with slots that accept connectors. Or a travertine herringbone fireplace insert. I thought my young grandkids wouldnt destroy it like if it was wood. It just looked like an oil-based polyurethane that had yellowed quite a bit over time. So happy already!. Her kids sold it to me for $40. I know you were probably thinking Meh if I dont like it, Ill just sand it down and paint it again. And then rolled out the marble printed contact paper and trimmed it to the length I needed for the entire glass top. Learn how your comment data is processed. In my eyes, PERFECTION!! Wow, Kristi! I finished the water closet area of our master bat, I just snapped this picture because the sunlight w, There have been a couple of changes in here. Don't set the table on its edge and then flip it over. It was described as anywhere from off-white to a yellowish color. You apply it just as you would caulking, and it comes in the same type tube. I just dont know if I can follow you anymore. I finally decided that I change my mind way too easily and often to pay that much for a coffee table. I did two coats, sanding lightly with 220-grit sandpaper between coats. The veins in the foreground of this picture were just like I wanted them, but the veins on the far side of the table hadnt been softened with the white yet. You can learn more about me here. Your being picky as you call it, is why your home is so beautiful! Thank you so very much for sharing all your knowledge for making a home our own and how to get there!! But opting out of some of these cookies may affect your browsing experience. Wonderful job and tutorial. You know where this story is going, right? and is unable to do physical work, so I do the majority of the work on the house by myself. I couldnt find a large sea sponge, so I used a yellow sponge from Home Depot (the kind found in the tile section) and pinched off pieces and cut it to give it a more natural look like a sea sponge. This meant we could use two squares for the top, two rectangles for the length on each side, and then one rectangle at either end. I had already made up my mind that if the finish was too yellow, I would paint it. Amazing. Nina. Your email address will not be published. About three weeks ago, I sanded the top down, primed it with Rust-Oleum spray primer, and then sprayed it with Rust-Oleum Painters Touch spray paint in white. I love this, it turned out beautiful. I then stuck it down with Gorilla glue, painted it black and grouted it with the same dark grout to fill in the gaps.

But, you made this a totally modern look and I love it! I have that paper in my stash and use it often too. If you're cutting the parts yourself, the extruded aluminum is easy to work with: Use an eight-teeth-per-inch metal-cutting blade in a jigsaw. Great job great idea! It's actually been 2 years since we started to remove all of the herringbone in other spaces. I recently did something similar with marble and a wire basket. (Be sure to protect it with a granite and marble sealer.) Xo, Brianne Complete the base by sliding the right-angle mounting clips into the groove. IKEA Farlov Sofa How Its Holding Up 8 Months Later, Best Places to Buy Furniture Hardware and Kitchen Cabinet Pulls. (You can wipe the knife clean using a rag dampened with mineral spirits.). It was just sitting on top and just lifted right off. While holding the table above the floor, flip it over and set it down on its feet. So beautiful, I love the softed muted look. used a "wipe on, wipe off" technique to be able to let the beautiful wood grain show through. .
Some of them just didnt look like real marble at all to me. You know what else they say? I liked the look of this table better anyway, and I bet the price was better, and now you have perfected it! That way youll never miss a thing! You can buy this aluminum in stock lengths and cut it to fit, as I did, but its manufacturer, 80/20, agreed to make parts available cut to the dimensions in our plans (80/20; PM Coffee Table Base, Item Q-38819; $188.56, plus shipping). with a horrific base on CL and wasnt sure how to attach hairpin legs that I had spray painted gold(!) Like super duper expensive. Im definitely hanging onto this marble paper idea for future reference though. You may be able to find more information about this and similar content at piano.io, How To Build a Low Sawhorse for Your Workshop, Create a Backyard Oasis With a DIY Stock Tank Pool, 15 Woodworking Projects for Every Skill Level.

Again, the goal is to be messy and imperfect. Heres how the table top looked after all of the big gray veins had been buried and softened to my liking. Scientists Turn Dead Spiders Into Creepy Grippers, Pentagon: Aid for Ukraine Crushes Russian Morale, The Zodiac Killer, the Secret SR-72, and More, When one too many houseguest has forgotten to use a coaster and your coffee table needs to be replaced, consider this quick but elegant DIY option. I knew it would help set the tone of the design aesthetic that I was transitioning to. That made me hesitate and continue to look. This is brilliant! Roman's room is full of fun DIY projects.
Looks amazing in your space! And I just couldnt bring myself to fork out over $1,000 for a marble coffee table. Thank you! (I have a slight addiction to this place.). After scouring the internet, we found the ideal one for the room - the plinth coffee table from Menu. Addicted 2 Decorating is where I share my DIY and decorating journey as I remodel and decorate the 1948 fixer upper that my husband, Matt, and I bought in 2013. Im afraid if I tried it, it would like a toddler spilled paint on it! Join our community: Get budget-friendly decorating ideas and DIY tutorials right in your inbox, Once upon a time, there was this magical place called the IKEA As-Is section. }); A quick and simple tutorial for how to transform furniture to look like marble with marble look contact paper. We believe in our home evolving with us. Also called a Type A file, it has a relatively coarse, double-cut tooth pattern.

I hope youll consider joining me on my actual blog by clicking here.). Is the bottom dark shelve of the table removable.Your finished image looks so much batter without the bottom shelve. Its not the hugest of spaces, and while we need a coffee table, we also wanted something we could put our feet up on. Oh, and if you hadnt noticed, weve been working on a couple of small changes in the living room, which youll see more of tomorrow. Time for paint!! (Note that I held the sander's miter gauge in position with a clamp.) We cut the half-round trim and started to brad nail them into the top and bottom panels.