Place your rocks in the tumbler and add Aluminum Oxide Polish, about 1 tablespoon per pound of rock. Use a pre-polish of either silicon carbide 500 or aluminum oxide 500 for this step, about 1 tablespoon per pound of load, and then add water up to the bottom of the top layer of rock. This site uses Akismet to reduce spam. Variable speed is important to get the right vibrations. It was on sale and it is made in Japan. Aluminium oxide on the other hand is very forgiving, and it works well on any material (I even use it for quartz and jade). Pick rocks that are of the same hardness and similar size ratio (the biggest should be no more than four times the smallest) to coordinate their development in the tumbling process. Thats why I decided to mount the motor on the frame and independently from the tub. There are a lot of options. Reply


In this case, its a cheap and easy way to get a vibration tumbler and the results are great. I kept it so simple and crude because I was doing trial and error. If the 3-M goes too quick, look at horse mats.
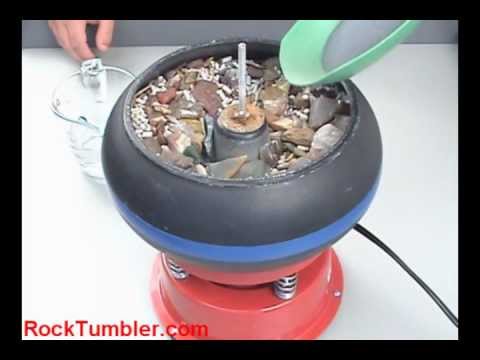
vibratory Fill the bowl of the tumbler about 3/4 full with your rock. You might find the rock hardness information helpful on the Mohs Scale reference.Be sure to see our grit kit designed specifically for the vibratory tumbler. No need for keyways and super easy to assemble and tighten.

Its 4mm mild steel. How Does The James Webb Telescope Phone Home? I use shavings from a bar of ivory soap in my burnish stages. Never go rockhounding in a pair of pants with an elastic waistband! After watching it, your build is all the more impressive. The Velcro connection to the plastic tumbler bowl was simply not robust enough to hold up to repeated use. These are all parts with blemishes or holes, so I cannot use them for customers anymore.

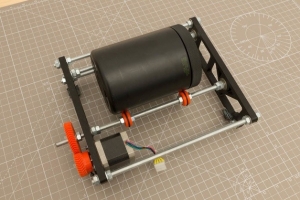
Date Posted:27 April 2015. Then you just need some rigid spacers and four bolts to mount the motor.

Instead, the sander was permanently bolted to the tumbler bowl, yielding more positive results. Ficara has added details to 125KHz tag reader and contactless lock. Return the rock to the bowl, add a tablespoon of soap flakes, and fill the bowl with water to the top of the rocks. So I can be confident that it will work great. What material to use?I work with aluminium profiles a lot and accumulated a selection of scraps over the years. After the final polish step, perform the washing/rinsing process and allow the stones to dry. However, if 'time is money' and you want to retain more of the shape and size of the original material, then a vibratory tumbler may be just what you need. Any job that takes a lot of time and elbow grease is a prime candidate for mechanical help, and this one is no exception.

Perhaps even sand, though one would want to control the silica dust issue with such things.In time, I assume the media would take a toll on the container, just as cleaning metal parts in a sonic cleaner does.Since you vibrate mechanically, it would seem even using silicone caulk to hold metal panels over the surfaces of the tub may not pose too much of a dampening problem. Yes, I worry a little bit about the tub. New to the Forum? Win win. The only drawback I can think of with Aluminium oxide is that since it is bright white, it tends to show a bit if it works its way into a hairline crack or fracture on the stone, but a good burnish stage and hand cleaning with an electric toothbrush will help minimize this. Yeah, but cracking all those walnuts would take forever! CV Based Barking Dog Keeps Home Secure, Doesnt Need Walking, Simple Universal Modem Helps Save And Load Data From Tape, Fix Old Caps, But Keep That Can Capacitor Look, New OS For Commodore 64 Adds Modern Features.
vibratory workshop Many variations can be found in regard to tumbling instructions that make adjustments for different tumbling equipment and different types of rocks. I'm new at this, though I have been collecting rocks for some time now (mostly agate and jasper). Must have been a cup of coffee short of awake when I went through your ible (don't know how I missed that video).Thanks. Use a bucket and a screen to collect used grit and slurry. Vibratory polishers just are not very good at shaping. Yes I had no idea about the springs. Evaporation will occur, especially if the external temperature is hot, so you may need to add water from time to time to maintain the slurry consistency. I didnt make this. They work fine. Citrine You have been extra diligent on cleaning the rocks and barrel. At the suggestion of friends, [VegOilGuy] decided it was time to invest in a vibration tumbler. If you cannot find one as cheap as this, you can try sourcing one from farming equipment or from a car.
Two motors are also more expensive than one and I belive that the industrial machines get custom made motors. So the tub has 10cm space to either side. I'm with IlanaI always use a rotory tumbler for the coarse grindsit's faster, it does a much better job of shaping, and it doesn't mess up the vibratory bowl.

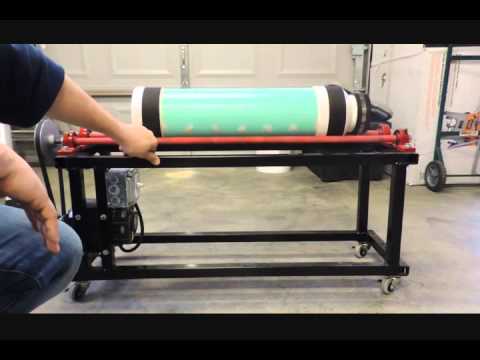
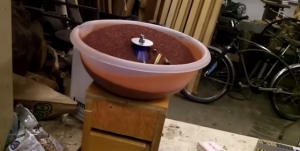
Also grinding compound for rock polishing. img.photobucket.com/albums/v357/john-edward/E-VibeApril2.jpg, img.photobucket.com/albums/v357/john-edward/Vibebatch3008.jpg, clicking here to make a cloudinary account. I couldnt find a lot of information on how to build one, so I experimented and here are my findings that hopefully help you. There are two types of tumblers, rotarry like a barrel filled with stones and vibratory which is more like a bathtub.

Okay, which one of you Illinois peeps won the $1.3 BILLION Mega Millions last night??? Thanks! Soap flakes (not detergent).
tumbler rock coin That is there to keep the front side from flexing. That should also decrease the friction inside.
The main goal here is to make everything beefy. With 230V, you need a VFD. I recommend calling a supplier and asking for advice. Oh, give me a home where the buffalo roam! Would love to see a before and after photo of what you tumbled with this.Nice job. The trampoline springs were very versatile in that way. I was hoping someone here could help me figure out a few things regarding rock tumbling using a vibratory rock tumbler. Of course, there could be multiple people that bought into a pool. Robert Kardos liked IS31FL3741 Breakout Board (PMOD).
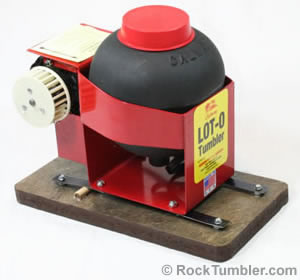
 tumbler vibratory homemade homemadetools advertisement polisher plywood
 Let it run for a day or so and make certain that a slurry is forming. Amethyst Avoid using unusually odd and non-rounded shaped rocks with the more common rounded shapes as these will be more difficult to sculpt.Rotary tumblers use a three step goal oriented tumbling process: Grind Pre-polish PolishBetween each of the four steps remove, thoroughly rinse your rocks, clean out the barrel and remove any grit or rock debris. 5 to 8 desk fans are cheap sources for the motors. A proper slurry is needed to get the best polish in the least time. That way the walls are soft, and the steel cannot rust anymore and of course the epoxy is also save from abbrasions. A small induction fan motor with a 1 long piece of steel rod, larger than the motor shaft. Press the space key then arrow keys to make a selection. As always, it is advised not to throw used grit down a drain as plumbing will be damaged. One final detail, its best to clean up now by cleaning your equipment thoroughly before everything dries and encrusts. That reduces the swinging mass on the tumbler so the forces on the shafts and bearings dont have to be as great. You can adjust the quantities for your specific needs. Simple barrel rollers are a quieter form of polisher old printer carriages work lovely to roll a length of PVC pipe full of parts & media, or you can just bolt any container to a slowly rotating motor to tumble stuff. Deeper pits, like a fold, should be cut or broken into two stones. None were effective. The VFD makes it possible to adjust the motor speed. ), Rockhounding Reports, Locations, Trips and Shows, Life in General, Off-topic Chit-Chat Area. Plastic pellets may be rinsed and reused, but you cannot reuse grit. This is somewhat of a advanced build, so I keep this simple and only show the important details. When the rock has achieved the desired smoothness and roundness, remove the load and rinse the bowl and the rocks thoroughly with water. In terms of coupling the mass to the shaft, I found that it will always spin with the shaft. On cordless drills you can change the speed by altering the voltage.
geology Super neat project here! That and it makes a bigger mess, and often leaves a "film" on the finished stones that can be difficult to remove. How to wire it up?If you are buying from a proper motor dealer, just ask them for advice. Sending my pallets to a tumbling company and back would cost 200 alone plus the work of course.
tumbler rock lot vibratory tumbling does take polish rocktumbler rotary tumblers use example barrel produces vibratory I agree, the white aluminium oxide polish definately yeilds the best results in a vibe. Not sure if underneath the tub or at the side is better.
vibratory If I could do this again, I would add more braces on the outside. If this is already your forum home, or if you have been inspired or helped here and would like to give back financially, the simpliest way is to route all your lapidary, household, or business needs through our.

You may be pulling some of the rocks out earlier than others as they will become smooth sooner and even show some luster.
You can see it at the end. Plastic pellets are great, but you can use small rocks having the same or lesser hardness as your load. The oder advantage is that you can see the parts as they are spinning and you can easily remove them.
They're so thick and heavy they wouldn't need glue.
tumbler rock polishing thumler vibrating diy stone vibratory tumblers tumbling use rocks stones uv polish lot glass agate I payed 1200,- for 150kg of media. We are open phone and internet orders during the COVID-19 crisis. At the end of this step it is most crucial to really clean the rocks and barrel which will be more difficult as you are using a finer grit.
steampunkworkshop tumbler vibratory diy Ordering special springs in the right size would have been impossible. However, sometimes large parts rub against the container or something like that and create bad spots. If you plan on being in the hobby for any length of time, I highly recommend picking up a rotory tumbler for first and second stage shaping, it's well worth the investment. Beading = INSTANT GRATIFICATION! Thanks for watching! But I know it will last a long time and just a few loads will pay for this machine.
tumbler rock diy tools stainless case Add the required amount of SiC (silicon carbide) grit and water.

The tumbling generates dust and it needs to be washed away. Once that has cured, I will glue on some 3mm rubber matts with contact cement. They also result in polished stones that retain the shape of the rough material, as opposed to the rounded shapes obtained by rotary tumbling. Your goal again in this step is to see that all the scratches from the first step are ground away, and the rocks have a smooth, matte finish. Hackaday Podcast 179: Danger Chess, Corona Motors, An Omni-Walker, And A Fast Talking Telescope, This Week In Security: Symbiote, Smart Locks, And CosmicStrand, Your Own Engineering Workstation, With Mame. Most industrial machines have two motors on either end of the tub. Anodizing Aluminium In The Land Of The Queen, Why Fedora Decided To Give CC0 Licensed Code The Boot, Where Pollution Hits The Road: The Growing Environmental Hazard Of Rubber Tires, The Surprisingly Manual Process Of Building Automotive Wire Harnesses, Biomimetic Surfaces: Copying Nature To Deter Bacteria And Keep Ship Hulls Smooth. If you want to find out more about media its best to contact a supplier. I think its the same as on any drill press. Emilio P.G. (Comment Policy).
Share it with us! Choosing a selection results in a full page refresh. Counterweight: I used whatever I had lying around. Repeat this step two more times. You dont need to clamp it on tightly like a pulley or gear. Ficara has added a new project titled 125KHz tag reader and contactless lock. I'm gonna need a bigger set of Greedy Grabbers, Count all your toes when you come out of the water. Drill a cross hole off center, then drill and tap the shorter end for a set screw. They come in any size. Somewhere in the middle! Nice in fact and deed. Initial tests were positive, with the tumbler successfully polishing some cast brass parts using crushed walnut shells. I love seeing stuff like this. If youve ever used an electric sander, youll know theyre an excellent source of vibration. The most important tips are standard.

I found it amusing to see the trampoline springs start with four of them and end up with (18) of them! I ended up with 1.5kg. If that is the case and once you see rounding has occurred for most or all of your rocks this move on to step 2. [VegOilGuy] is still looking for a more abrasive media to use for initial patina removal, however. Obviously you want some steel to hold it on. For a 2.5 lb bowl, sizes from 1/8" to 1" work well. Please Introduce Yourself, Special Creations (intarsia, glass, metal, etc. There is a wide array on media out there.
tumbler diy Check out my other instructable if you need ideas. Keep records, so if you make changes you will know the effect the changes had on the polishing. Safety is key, so make sure it is on there properly. It'd be fun to see what finer media would do with something. Using Aluminium has the advantage that it is easier to move around the workshop. The Grit to rock ratio here is 2 tablespoons of grit per pound per pound of rock. They have a similar part at driven front wheels.For the pulleys I used taper locks. Where to place the Motor?
tumbler brass diy Otherwise I was affraird it would shake itself to bits. Ideally you should use steel. A finer grit can get you polished surfaces, but that also means that they dont remove burrs.
I learned that shielded motor cables are important for VFDs. Author: Brian Boyle https://www.instructables.com/id/Bandsaw-Stand-OuHow big should I make the frame? That only works at low voltages and DC power. Can't argue with the results. So add a drain at the bottom and also a fresh water supply. On ther other hand, the tub is very imple and should it wear through it would be a cheap part to replace. All in both a rock tumbler and a vibrating brass cleaner (great for brass metals with walnut and a little polish). One new vibratory tumbler, lots of questions! In the video you sometimes see me use a clamp across the opening of the tub. Good results come from starting with relatively crevase and pitt free rock, (or starting them in a rotary), I always barrel tumbled my rocks for the first two stages.
vibrating polisher homemadetools vibratory boyer powered recliner repurposed Add water until it is just below your top layer of rocks.

The Cerium Oxide is supposed to be good for material like quartz, but I have always found it difficult to get the mix just right, ie too thick and it doesn't work, too runny and it doesn't work, ect.
tumbling Electrolytes, Theyre What Dehydrated Hackaday Writers Crave! That certainly says something about the vibrations. Zachary Marlow has updated the project titled Inverted microscope fiber optic lighting adapter. So I didnt have to buy material and I got rid of scraps. My VFD is from Yaskawa. Rocks. If you have a Rotary Tumbler we have instruction for those here.General Tips for Tumbling and doing Pretty Much Anything Else Belief that you can make something great Patience Attention to detail More Patience, grit kit designed specifically for the vibratory tumbler. You could of course mount the motor directly to the tub, but then it might shake itself to bits, or the shaft of the motor could break.
However if you want variable speed, you need a VFD.

Not standard industrial motors as I have used. Learn more, Building A Vibration Tumbler On The Cheap. Sometimes the best tools are the ones you build yourself. Plus, to make it more "beautiful" you can grind down and smooth the rough joins.
The durations for each step are approximate - check your load and keep records to find the conditions that work best for you. Man, what a fun project. Vibratory rock tumblers, such as those made by Raytech and Tagit, can polish rocks in a fraction of the time required by rotary tumblers. Never stop learning , I'm Trying to learn somthing new every day. You'll lose your pants! Some of the rocks may be now too small or too odd to continue working with them, so you will remove these rocks. This is plastic media which is a little bit more leightweight than ceramic media. Once that is the case you are done with this step. The best I get is sanding with about #400 wet/dry. If you have the instruction manual that came with the tumbler, start out with those quantities. Emilio P.G. Welcome Guest. I wasnt sure if I could weld it watertight on my own, so that was one unknown out of the equation.
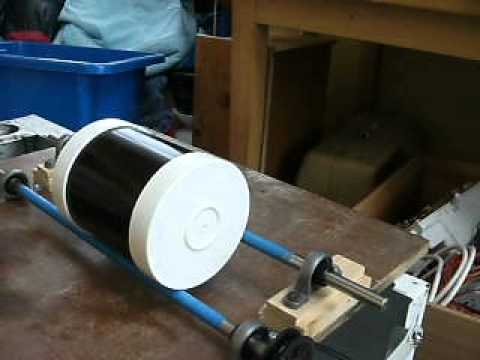 tumbler homemade brass
 Without this setup, this machine would not run at all. The best check for completed rocks is that they look as now as they would if wet. That way the tub can move independently from the tub. This stuff is expensive. Great to see, very well done :D. Impressive build from scratch and from thought to reality.
This is really important as the coarser grits from one step will act adversely in proceeding steps,scratching rocks as you are refining them with finer media. You are looking to round your rocks in this step over 7 to 10 days. This is so important because any grit can ruin the progress of your rocks in the final polish step. As for the welding - yeah, aluminum welding isn't as easy as steel.

File uploads still not working? *Use a slow speed for all steps when polishing stones with Mohs hardness of 6.5 or lower (peridot, opal, lapis, obsidian, apatite, etc.).
Tumble time here is up to 7 days, with more checking slurry consistency and general progress every day or two. Last minute or so. What Motor to chose?I had a rough idea on how much power I would need, but no clue as to what speed would be right. This instructable is a guide on how to design a vibratory tumbler. Use left/right arrows to navigate the slideshow or swipe left/right if using a mobile device. On the other hand, vibratory tumblers tend to be a bit more expensive than their rotary counterparts. Rinse the rocks and the bowl. How to connect aluminium extrusions? Some of them are already really pretty, but I would like to know what they would look like once nicely polished. Initially, the intention was to build a tumbler with the sander being removable and still usable for its original purpose. Choose a theme for the widget from Cloudinary's. Return the rocks to the bowl and proceed to the next polishing step with the next grit (see the Table).
tumbler vibratory What I could do right now would be PE sheets that I could rivet against the hull.
tumbler rock homemade diy parts stone jewelry tumbling machine making etc jewellery wire rotary stones That way all the force from the vibrations will go into the media and not into the steel tub that flexes. The reason they say 'Women and children first' is to test the strength of the life boat.
tumbler vibratory tumblers homemade diy homemadetools plans advertisement rockbottom Rock Tumbling Instructions For Vibratory TumblersThe tumbling process starts with good rock selection. The grit may settle out of the mixture altogether. The, Rock Tumbling = Patience! Step four takes up to seven days but be sure to check the rocks as you are proceeding because some will be finished earlier. The VFD of course adjusts the speed, so I was only focusing on the power.
vibratory wmv Did you make this project?