There are people who need a backup camera system that only comes on during reverse, and those who want it to stay constantly on. You may want to ensure all cables and connections are secured tightly. 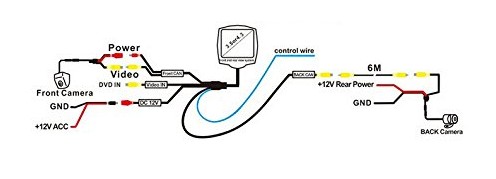 The tab on the top is aligned along 1 side such that it fits into the slot in the back of the connector as shown in this figure: Once the pin is inserted, the retainer should be snapped into place. This will save you the time required to install the reverse trigger and will also save you money.
  Your new reverse camera setup will complement your parking skills and drastically increase the safety of your vehicle. Include your email address to get a message when this question is answered. far left side). WhatsApp / Viber for English speaking users, WhatsApp para los usuarios que hablan espanol, Peculiarities of a camera connection via a video interface, Common mistakes when connecting a rear view camera. To successfully install a rear-view camera, first remove your vehicles rear license plate and interior trunk panel.
 3) Select the "Info" tab. 2) Carefully remove the plastic cover around the head unit and unscrew/unbolt as appropriate The disadvantage is that your vehicles battery could get drained, when you dont use the vehicle for a while. Feed the camera wire through to the interior of the vehicle either by drilling a new hole; or using the existing hole for the number plate light if possible.
  The camera requires a 12 volt reverse feed in order to switch on the camera and monitor when reverse is selected. reverse wiring camera backup under dodge ram hooking hood pro truck backup 3) Slide the unit out and Unplug the 28-pin from the back of the OEM head unit. Then, run your cable through the exposed chamber. One advantage of wiring the camera this way, is that you have absolute control over it. -2013-2015 Scion FRS This is an imortant question. The reverse trigger wire is installed in pin 2 of this connector. 7) Turn the car off. Such approach provides a warmed matrix and a perfect image, particularly in the night time. Are the plus and minus taken from the same place? This is the reverse trigger wire. 5) Shift the car out of reverse. Nobody likes to admit it, but backing down long driveways and through narrow gaps, or nailing that perfect parallel park can be pretty tricky - and no matter how much practice you put in, there will always be blindspots, which can make reversing more dangerous than it needs to be. -2013-2016 Toyota Avalon Thus, the chances of successful installation are much higher. Look for an auto electrician if you need someone to call. It is also possible to connect the camera or camera system to the vehicles ignition. If you are not quite sure about your installers, give them this article to read. One advantage of having your backup camera system always on in this way, is that you can use it as a security system, if your monitor has a video recording function. 7) Turn the vehicle's ignition OFF. A fuse tap is a small cable that converts a bare wire into a fuse signal. All rights reserved. Eventually, a camera should fit the general picture. And don't forget to like the video and subscribe to our YouTube channel, if you haven't done it yet. But the camera shows upper view and not the ground below. Incorrect power supply can cause damaging of the device itself or the car wiring, improper work of the camera or poor quality of a picture. If you fail to use a fused power source, then you risk damaging your backup camera system. Your browser's Javascript functionality is turned off. 5) Reconnect the 28-pin connector to the back of the head unit. Identify which connector type you have based on this figure: The Type 1 pin has a slot in the bottom. fol sx4 When installing an Always On system, you are best advised to use a reliable camera, which is proven to withstand extreme weather conditions. Some camera models use wireless transmitters instead of standard video cables. If you don't have a rear view monitor, you need to locate the camera installation place, then wire the red wire of the camera to reverse lights and black wire to the ground. Make sure you poke your positive (usually red) bare wire through the positive reverse light wire and the negative (usually black) bare wire through the negative reverse light wire. Ensure the park brake is engaged, and switch on the ignition. -2014-2015 Scion xB. This time we offer you some pieces of advice for camera power connection in a car. If a rear view camera (please note, not the image from a camera, but a reverse camera itself) is activated by shifting to the rear gear, you can connect it to reversing lights lamps. This way, nothing will stop your camera from staying on. Which signal is supplied to the camera, constant or a pulsating one (for more details read the first part of this article). 1) Verify that the vehicle is off Or, would I need to connect to the reverse wire on the gearbox? If you do this, please contact support at inquiry@autoharnesshouse.com. Looking to learn more about Reversing Cameras? You can connect the camera to a constant power source, and simply have it always on. Using this method, the camera will only come on after the engine has been started. You could also get the power straight from the fuse box, although you will need to know exactly what you are doing. Yes, backup cameras can always be on, you just need a good quality product and the right installation skills. Sign up for wikiHow's weekly email newsletter. For certain trucks, you may need to run the video cable through the vehicles frame rail. These cords look different for every vehicle so, if you cant find them, consult your owners manual for model specific information. ACC mode does not always work). 6) Slide the head unit back into position.
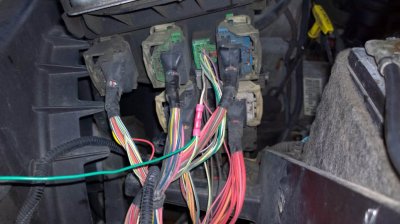
  This requires running an additional wire to the back of the car. In this particular camera, the yellow plug is for the video feed from the camera, and the white plug opens up the option for a second camera if desired. The cigarette lighter socket, is the most convenient way of doing this. Copyright Brakelightcamera.com Operated by Vardsafe Technology Co.,Ltd. Here's how we found the screen on our Subaru BRZ(The Subaru BRZ has the trigger wire installed from the factory). One end of the wire will connect to the 28-pin connector on the back of your vehicle's head unit. wiring pyle What can I do ? *Important information* - Click here to read more about our How-To terms and conditions. If the reverse trigger wire is intalled in your connector, you will not need to install the wire yourself. The third method is the use of a button to switch on the camera at will. Manual for the video interface will help you find out the right position. The reverse trigger wire, provided with the backup camera harness, Has a pin on one end that will slide into the 28-pin connector. Yes, that will be fine, that how it is supposed to be done. If, according to an operation logics of the already installed equipment, all electronics turns on at the moment the power is supplied to a head unit / monitor, then a camera should be connected in the corresponding way. Attach a bare wire power cable to your cameras power connector, then strip your cars reverse light wires and splice them with your bare wire power cable. Then, learn about logics of an installed equipment operation. % of people told us that this article helped them. Last Updated: February 26, 2021 Bolt it back into place. Power. I hooked the camera up and it just flickers.
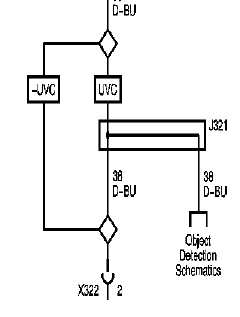
 Most head units display the state of the reverse signal on one of the system information screens. This power source is easy to tap into, just locate the reverse lamp in your tail light assembly and use a test light or multimeter - to determine which wire is positive. The picture on the right is from our Subaru BRZ. Using a power drill, punch a small hole through the exposed license plate mounting area and run your cameras power and video cord through it. The ideal height is based off the specific car or vehicle that you have and your personal preferences, along with its intended application. If youd prefer, you can leave the bare wire cable off and connect your cameras power cable to a cigarette lighter adaptor. Your payment is protected by PayPal's Online Purchase Protection Program. The camera needs to be connected to a constant power source to stay on. Use your multimeter to see if the ground is okay.
  What can you do if an installed camera doesn't work or works inconsistently? Double check that all connections are correct. Our website uses cookies to improve your experience. -2012-2014 Toyota Yaris (The Yaris Hybrid may be an exception to this) THIS IS NOT A COMPLETE LIST. The pin will slide into the back of the connector and snap into place. We will discuss both of these connections below. To learn how to mount the rear-view camera and backup monitor, scroll down! -2014-2015 Toyota Tacoma {"smallUrl":"https:\/\/www.wikihow.com\/images\/thumb\/7\/7c\/Install-a-Rear-View-Camera-Step-1-Version-2.jpg\/v4-460px-Install-a-Rear-View-Camera-Step-1-Version-2.jpg","bigUrl":"\/images\/thumb\/7\/7c\/Install-a-Rear-View-Camera-Step-1-Version-2.jpg\/aid9781246-v4-728px-Install-a-Rear-View-Camera-Step-1-Version-2.jpg","smallWidth":460,"smallHeight":345,"bigWidth":728,"bigHeight":546,"licensing":"
License: Creative Commons<\/a> License: Creative Commons<\/a> License: Creative Commons<\/a> License: Creative Commons<\/a> License: Creative Commons<\/a> License: Creative Commons<\/a> License: Creative Commons<\/a> License: Creative Commons<\/a> License: Creative Commons<\/a> License: Creative Commons<\/a> License: Creative Commons<\/a> License: Creative Commons<\/a> License: Creative Commons<\/a> License: Creative Commons<\/a> License: Creative Commons<\/a> License: Creative Commons<\/a> License: Creative Commons<\/a> License: Creative Commons<\/a> License: Creative Commons<\/a>
\n<\/p>
\n<\/p><\/div>"}, Nonprofit organization dedicated to consumer advocacy and product testing, {"smallUrl":"https:\/\/www.wikihow.com\/images\/thumb\/7\/79\/Install-a-Rear-View-Camera-Step-2-Version-2.jpg\/v4-460px-Install-a-Rear-View-Camera-Step-2-Version-2.jpg","bigUrl":"\/images\/thumb\/7\/79\/Install-a-Rear-View-Camera-Step-2-Version-2.jpg\/aid9781246-v4-728px-Install-a-Rear-View-Camera-Step-2-Version-2.jpg","smallWidth":460,"smallHeight":345,"bigWidth":728,"bigHeight":546,"licensing":"
\n<\/p>
\n<\/p><\/div>"}, {"smallUrl":"https:\/\/www.wikihow.com\/images\/thumb\/d\/d3\/Install-a-Rear-View-Camera-Step-3-Version-2.jpg\/v4-460px-Install-a-Rear-View-Camera-Step-3-Version-2.jpg","bigUrl":"\/images\/thumb\/d\/d3\/Install-a-Rear-View-Camera-Step-3-Version-2.jpg\/aid9781246-v4-728px-Install-a-Rear-View-Camera-Step-3-Version-2.jpg","smallWidth":460,"smallHeight":345,"bigWidth":728,"bigHeight":546,"licensing":"
\n<\/p>
\n<\/p><\/div>"}, {"smallUrl":"https:\/\/www.wikihow.com\/images\/thumb\/f\/fa\/Install-a-Rear-View-Camera-Step-4.jpg\/v4-460px-Install-a-Rear-View-Camera-Step-4.jpg","bigUrl":"\/images\/thumb\/f\/fa\/Install-a-Rear-View-Camera-Step-4.jpg\/aid9781246-v4-728px-Install-a-Rear-View-Camera-Step-4.jpg","smallWidth":460,"smallHeight":345,"bigWidth":728,"bigHeight":546,"licensing":"
\n<\/p>
\n<\/p><\/div>"}, {"smallUrl":"https:\/\/www.wikihow.com\/images\/thumb\/3\/39\/Install-a-Rear-View-Camera-Step-5.jpg\/v4-460px-Install-a-Rear-View-Camera-Step-5.jpg","bigUrl":"\/images\/thumb\/3\/39\/Install-a-Rear-View-Camera-Step-5.jpg\/aid9781246-v4-728px-Install-a-Rear-View-Camera-Step-5.jpg","smallWidth":460,"smallHeight":345,"bigWidth":728,"bigHeight":546,"licensing":"
\n<\/p>
\n<\/p><\/div>"}, {"smallUrl":"https:\/\/www.wikihow.com\/images\/thumb\/e\/e3\/Install-a-Rear-View-Camera-Step-6.jpg\/v4-460px-Install-a-Rear-View-Camera-Step-6.jpg","bigUrl":"\/images\/thumb\/e\/e3\/Install-a-Rear-View-Camera-Step-6.jpg\/aid9781246-v4-728px-Install-a-Rear-View-Camera-Step-6.jpg","smallWidth":460,"smallHeight":345,"bigWidth":728,"bigHeight":546,"licensing":"
\n<\/p>
\n<\/p><\/div>"}, {"smallUrl":"https:\/\/www.wikihow.com\/images\/thumb\/2\/21\/Install-a-Rear-View-Camera-Step-7.jpg\/v4-460px-Install-a-Rear-View-Camera-Step-7.jpg","bigUrl":"\/images\/thumb\/2\/21\/Install-a-Rear-View-Camera-Step-7.jpg\/aid9781246-v4-728px-Install-a-Rear-View-Camera-Step-7.jpg","smallWidth":460,"smallHeight":345,"bigWidth":728,"bigHeight":546,"licensing":"
\n<\/p>
\n<\/p><\/div>"}, {"smallUrl":"https:\/\/www.wikihow.com\/images\/thumb\/6\/67\/Install-a-Rear-View-Camera-Step-8.jpg\/v4-460px-Install-a-Rear-View-Camera-Step-8.jpg","bigUrl":"\/images\/thumb\/6\/67\/Install-a-Rear-View-Camera-Step-8.jpg\/aid9781246-v4-728px-Install-a-Rear-View-Camera-Step-8.jpg","smallWidth":460,"smallHeight":345,"bigWidth":728,"bigHeight":546,"licensing":"
\n<\/p>
\n<\/p><\/div>"}, {"smallUrl":"https:\/\/www.wikihow.com\/images\/thumb\/9\/97\/Install-a-Rear-View-Camera-Step-9.jpg\/v4-460px-Install-a-Rear-View-Camera-Step-9.jpg","bigUrl":"\/images\/thumb\/9\/97\/Install-a-Rear-View-Camera-Step-9.jpg\/aid9781246-v4-728px-Install-a-Rear-View-Camera-Step-9.jpg","smallWidth":460,"smallHeight":345,"bigWidth":728,"bigHeight":546,"licensing":"
\n<\/p>
\n<\/p><\/div>"}, {"smallUrl":"https:\/\/www.wikihow.com\/images\/thumb\/6\/63\/Install-a-Rear-View-Camera-Step-10.jpg\/v4-460px-Install-a-Rear-View-Camera-Step-10.jpg","bigUrl":"\/images\/thumb\/6\/63\/Install-a-Rear-View-Camera-Step-10.jpg\/aid9781246-v4-728px-Install-a-Rear-View-Camera-Step-10.jpg","smallWidth":460,"smallHeight":345,"bigWidth":728,"bigHeight":546,"licensing":"
\n<\/p>
\n<\/p><\/div>"}, {"smallUrl":"https:\/\/www.wikihow.com\/images\/thumb\/5\/59\/Install-a-Rear-View-Camera-Step-11.jpg\/v4-460px-Install-a-Rear-View-Camera-Step-11.jpg","bigUrl":"\/images\/thumb\/5\/59\/Install-a-Rear-View-Camera-Step-11.jpg\/aid9781246-v4-728px-Install-a-Rear-View-Camera-Step-11.jpg","smallWidth":460,"smallHeight":345,"bigWidth":728,"bigHeight":546,"licensing":"
\n<\/p>
\n<\/p><\/div>"}, {"smallUrl":"https:\/\/www.wikihow.com\/images\/thumb\/5\/54\/Install-a-Rear-View-Camera-Step-12.jpg\/v4-460px-Install-a-Rear-View-Camera-Step-12.jpg","bigUrl":"\/images\/thumb\/5\/54\/Install-a-Rear-View-Camera-Step-12.jpg\/aid9781246-v4-728px-Install-a-Rear-View-Camera-Step-12.jpg","smallWidth":460,"smallHeight":345,"bigWidth":728,"bigHeight":546,"licensing":"
\n<\/p>
\n<\/p><\/div>"}, {"smallUrl":"https:\/\/www.wikihow.com\/images\/thumb\/a\/a3\/Install-a-Rear-View-Camera-Step-13.jpg\/v4-460px-Install-a-Rear-View-Camera-Step-13.jpg","bigUrl":"\/images\/thumb\/a\/a3\/Install-a-Rear-View-Camera-Step-13.jpg\/aid9781246-v4-728px-Install-a-Rear-View-Camera-Step-13.jpg","smallWidth":460,"smallHeight":345,"bigWidth":728,"bigHeight":546,"licensing":"
\n<\/p>
\n<\/p><\/div>"}, {"smallUrl":"https:\/\/www.wikihow.com\/images\/thumb\/d\/d4\/Install-a-Rear-View-Camera-Step-14.jpg\/v4-460px-Install-a-Rear-View-Camera-Step-14.jpg","bigUrl":"\/images\/thumb\/d\/d4\/Install-a-Rear-View-Camera-Step-14.jpg\/aid9781246-v4-728px-Install-a-Rear-View-Camera-Step-14.jpg","smallWidth":460,"smallHeight":345,"bigWidth":728,"bigHeight":546,"licensing":"
\n<\/p>
\n<\/p><\/div>"}, {"smallUrl":"https:\/\/www.wikihow.com\/images\/thumb\/9\/95\/Install-a-Rear-View-Camera-Step-15.jpg\/v4-460px-Install-a-Rear-View-Camera-Step-15.jpg","bigUrl":"\/images\/thumb\/9\/95\/Install-a-Rear-View-Camera-Step-15.jpg\/aid9781246-v4-728px-Install-a-Rear-View-Camera-Step-15.jpg","smallWidth":460,"smallHeight":345,"bigWidth":728,"bigHeight":546,"licensing":"
\n<\/p>
\n<\/p><\/div>"}, {"smallUrl":"https:\/\/www.wikihow.com\/images\/thumb\/3\/37\/Install-a-Rear-View-Camera-Step-16.jpg\/v4-460px-Install-a-Rear-View-Camera-Step-16.jpg","bigUrl":"\/images\/thumb\/3\/37\/Install-a-Rear-View-Camera-Step-16.jpg\/aid9781246-v4-728px-Install-a-Rear-View-Camera-Step-16.jpg","smallWidth":460,"smallHeight":345,"bigWidth":728,"bigHeight":546,"licensing":"
\n<\/p>
\n<\/p><\/div>"}, {"smallUrl":"https:\/\/www.wikihow.com\/images\/thumb\/2\/29\/Install-a-Rear-View-Camera-Step-17.jpg\/v4-460px-Install-a-Rear-View-Camera-Step-17.jpg","bigUrl":"\/images\/thumb\/2\/29\/Install-a-Rear-View-Camera-Step-17.jpg\/aid9781246-v4-728px-Install-a-Rear-View-Camera-Step-17.jpg","smallWidth":460,"smallHeight":345,"bigWidth":728,"bigHeight":546,"licensing":"
\n<\/p>
\n<\/p><\/div>"}, {"smallUrl":"https:\/\/www.wikihow.com\/images\/thumb\/4\/43\/Install-a-Rear-View-Camera-Step-18.jpg\/v4-460px-Install-a-Rear-View-Camera-Step-18.jpg","bigUrl":"\/images\/thumb\/4\/43\/Install-a-Rear-View-Camera-Step-18.jpg\/aid9781246-v4-728px-Install-a-Rear-View-Camera-Step-18.jpg","smallWidth":460,"smallHeight":345,"bigWidth":728,"bigHeight":546,"licensing":"
\n<\/p>
\n<\/p><\/div>"}, {"smallUrl":"https:\/\/www.wikihow.com\/images\/thumb\/1\/1f\/Install-a-Rear-View-Camera-Step-19.jpg\/v4-460px-Install-a-Rear-View-Camera-Step-19.jpg","bigUrl":"\/images\/thumb\/1\/1f\/Install-a-Rear-View-Camera-Step-19.jpg\/aid9781246-v4-728px-Install-a-Rear-View-Camera-Step-19.jpg","smallWidth":460,"smallHeight":345,"bigWidth":728,"bigHeight":546,"licensing":"
\n<\/p>
\n<\/p><\/div>"}, {"smallUrl":"https:\/\/www.wikihow.com\/images\/thumb\/c\/ce\/Install-a-Rear-View-Camera-Step-20.jpg\/v4-460px-Install-a-Rear-View-Camera-Step-20.jpg","bigUrl":"\/images\/thumb\/c\/ce\/Install-a-Rear-View-Camera-Step-20.jpg\/aid9781246-v4-728px-Install-a-Rear-View-Camera-Step-20.jpg","smallWidth":460,"smallHeight":345,"bigWidth":728,"bigHeight":546,"licensing":"