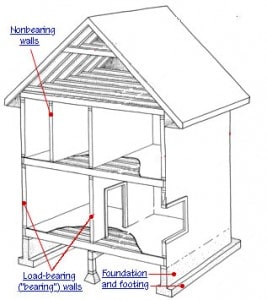
Making MDF Walls Making a Small Workshop (Part 2), Tide banking review for your small business. That will stabilize the partition wall in relation to the garage. (How To Tips! View our Privacy Policy here. Often, a larger top plate is required. Transfer lines from the top plate to the header, showing where the cripple studs go. Mask off the edges that you dont want primed and painted. In this video I make a start by building some temporary stud partition walls. The Ridgid Impact driver proved to be effective in drilling in the Tapcon screws. Framing with good materials and smart techniques lay the groundwork for everything that follows: smooth walls, countertops that fit perfectly, and doors that swing without sticking. Weve always heard that building the wall on the ground fist then lifting it up is easier.BUT weve havent been able to experience this in any house weve lived in because all the houses weve lived in are older and the walls/floor are not even. Thank you very much for reading the post. Place the base plate in the correct location and draw lines on both sides of the plate. We chose the model that has a silencer. If it's not 3 inches, then that abutting wall is not plumb. If a doorway is planned, add 2 inches to the door's width and height to determine the dimensions of its rough opening. Now that the partition wall framing has been completed and the door hung, you can start nailing the sheathing to the frame. Nail these up to the beams in a crossing motion. However, many builders prefer a double plate on non-loading walls. In most cases, a partition wall built with 2x4s on 16-inch centers provides plenty of strength, but when Tom frames any wall more than 8 feet tall (or one that bears a load), he often adds blocking. Attach the frame to the ceiling crossbars using 2 nails for each crossover.Using your masonry bit drill through the concrete floor to anchor the frame down. There is another model without a silencer. (What Is Really Better?). Typically, partition walls are non load bearing. We decided that we could use two top plates and 8' studs would fit without cutting or we could have used one top plate, purchased longer 2x4s, then cut them to size. Set header against top plate between king stud locations. Think of it as Framing Carpentry 101. 3.5-Peak HP NXT Wet/Dry Vac (, RIDGID 1 Gal. a new patio: There is nothing we love, Read More DIY Concrete Patio Using Quikrete Paver MoldContinue, Studded Wall Insulation Week 5 of the One Room Challenge is all about installing studded wall insulation for our garage conversation project. We had to add some blocking to extend a 2x4 over the placement of the top plate so that we had something to screw into to support the wall. Once all the doorway components have been set-up, the pre-hung door can be installed in the doorway frame. If you are lucky, you will have a ceiling joist running exactly above where the bottom plate has been anchored to the garage floor. Copyright I especially like the bright display. Let us know by dropping a note in the comment box below. But plunge pools fill the middle ground, give a splash of fun, and offer relaxation in smaller yards. We had the same issue with the divider wall in between the two closets. 18-Volt Brushless Cordless Air Compressor (, DEWALT 20-Volt Max Lithium-Ion 18-Gauge Cordless Brad Nailer Kit (. The website is also an affiliate of a few other brands. This is a new situation for me. No added electricity. We continually vacuumed out the wood and concrete dust which was essential so the screws could be fully screwed into place. (A Really Helpful 10 Step Guide! Your privacy is taken seriously. Draw an "X" between each pair of lines, showing king stud locations. NOTE 1: The calculation of 19 studs assumes that you will have the two end studs on the partition wall, which will get nailed to the stud in the garage wall. To keep consistent with building regulations, its important that you build a bottom plate, a top plate, and nail the studs 16 inches apart, on center. Our complete framing process included building the: In addition to building the partition walls, we have four windows we need to frame in the bedroom. Frame around the door in between the studs. Our first DIY concrete patio project is complete (hallelujah!). Make your markings abundantly clear as to which side the 24 should be nailed in. This light is a nice portable solution. These blocks represent the combined thickness of the sole and top plates. We will be adding the bolts since this is an exterior wall.).

You will still need to fill the nail or screw holes with a wood filler and sand. Andy ran a successful property maintenance and woodworking business for many years. If the top plate lands between the joists, nail it to blocking. This fixes the exact location. Also, cut all the cripples, including the two that lie against the king studs, to length: the length of the king stud minus the length of the jack, minus the thickness of the header. It will be a lot easier than sanding them while standing on a ladder or crouching on the floor. 1995-2022 MH Sub I, LLC dba Internet Brands. Before driving in any nails, use a 4-foot level to check that the stud edges and faces are plumb (perfectly vertical). Many people with large two-car garages will do this to separate a workshop space away from their car. Garage is no longer a space, just to park your cars. After determining where the wall was going to be built, we cut out the baseboard so the 2x4 would sit flush to the side wall. If you are a DIYer, you will already have these. If youve ever had to get electric work done on your house, you know how the dollar signs can, Read More Top 10 Must Have Electrical Tools and Equipment for HomeownersContinue, Planning a Garage Conversion Here we go! Cut two more to 79 high. Compound over the tape and smooth it out. At the first stud, draw a line across both plates. Then the wall is ready for drywall. Measure the chalk lines to determine the lengths of the sole and top plates. This way, an exact measurement can be taken stud by stud and that will help minimize gaps in between the stud and the top and/or bottom plate. For example, Cully draws a line where the 24 should be nailed, then marks an X to know what side of the line it should be nailed. Determine the length and height of the wall using a tape measure. home improvement and repair website. This, Read More How to Get Building Permits for your Home RenovationContinue, Must have Electrical Tools and Equipment Welcome to week 4 of the One Room Challenge! Continue to do this until you have gotten all-around from ceiling to floor.Step Nine- Finish the DrywallNow that the drywall is hung, you want to joint it in with mud. It goes like this Cully and I got into a little tiff about where the bug spray was. T-Star Drive Flat-Head Partial Thread Yellow Zinc Coated Multi-Material Screw (, RIDGID 18-Volt Lithium-Ion Cordless Brushless Drill/Driver and Impact Driver Combo Kit (, Bosch SDS-Plus Bulldog Xtreme Variable Speed Rotary Hammer (, Dremel Multi-Max 4 Amp Variable Speed Corded Oscillating Multi-Tool Kit (, Dremel Saw-Max 6.0 Amp Variable Speed Corded Tool Kit for Wood, Plastic and Metal (, Husky 24 in. It can be a daunting task, especially if you have never renovated a home before. The remaining vertical stud ends need to be attached to the bottom and top plates at the spots marked out earlier. He was outside working on one of the sprinklers, Read More Dollar Tree Organization for Your ClosetContinue, We did it! Please also read our Privacy Notice and Terms of Use, which became effective December 20, 2019. Cut it flush with each jack stud, without sawing into the subfloor. Copyright (c) 2013-2022 gosforthhandyman.com, Making a Temporary Stud Partition Wall - Workshop Upgrade Part 1. It's very gratifying to have researched how to build a wall, participate in the planning and building and then to see that the finished wall is strong, plumb, and in NO danger of falling over! Is it easier to build and lift? Measure as you go along to ensure everything is straight and level. Remove the header. x 3-1/4 in. I started off by fitting the top plate of the stud wall to the bottom chord of one of the roof trusses. So it goes until all the bays are filled. Use a brush for the edges and a roller or spray for the main area. When you get to any door or window opening, be sure to clearly mark where the king stud and jack studs will go. Try to locate it such that it aligns with a stud in the garage wall on either side. Drywall of the same dimensions will weigh around 74 pounds. This week we dive into building a garage partition wall. This tool drives the nails with ease. The sheathing material, such as drywall, is nailed to the partition wall frame. This Husky digital level is a great addition to our tool collection. ), the cost of this project will obviously decrease. Join pieces at right angles to each other first, by driving two 16d nails, side by side, through the face of one piece and into the end of the adjoining piece. Thanks so much for your comment. Draw another line 1 inches from the first. Now you can paint or finish it however you choose. How to Install Drywall On Standard 90-Degree Outside Corners, How to Install a Parquet Flooring Transition, How to Install a Curtain Rod in a Metal Wall, Replacing a Roof Truss with Stick Framing. Mark off 1 from the left edge. An effective herbicide can get rid of a variety of weeds that have invaded your lawn. At this moment we were so proud of ourselves. Place header against sole plate in doorway; mark each end onto plate. The Dremel Multi-Max came in handy cutting this very thin wood. Check out the YouTube video below: If you do not like the idea of toenailing studs to the plates, thats OK. By choosing I Accept, you consent to our use of cookies and other tracking technologies. Read More 10 Reasons Why It Is Better To Drywall A Detached GarageContinue, Read More Do Garage Walls Have To Be Drywalled? To get this simply add 2 to the door width. Continue this process until the seam disappears.Thats it. Update 5/24: All framing passed inspection! The studs on the two ends should be attached to the studs in the garage walls using long nails or #10X3 wood screws. (The Truth! To find the stud length, stack two 2x4 blocks face-to-face on the floor layout line and measure up to the ceiling layout line. If the walls aren't plumb, stagger the plates by the differences in the Step 1 plumb-bob measurements. If your ceiling doesnt have a stud you will need to nail a crossbar up to serve as support for the wall. Make sure you center it on the seam. Thank you for your support of my creative business!**. How To Finish OSB Garage Walls In 3 Easy & Simple Steps! The actual dimension is 1 X3 .if(typeof ez_ad_units!='undefined'){ez_ad_units.push([[300,250],'garagemadesimple_com-leader-2','ezslot_13',132,'0','0'])};if(typeof __ez_fad_position!='undefined'){__ez_fad_position('div-gpt-ad-garagemadesimple_com-leader-2-0')}; Mark out the rough door opening width on the base plate. Sign up to my very occasional newsletter to keep up to date with the channel. My question is how do you decide between nails or screws? Even though all this work ends up buried behind drywall, shortcuts lead to trouble. https://www.krista-howard.com/wp-content/uploads/2021/05/Building-a-Garage-Partition-Wall-Blog-Pictures.mp4, https://www.krista-howard.com/wp-content/uploads/2021/05/Building-a-Garage-Partition-Wall-Blog-Pictures-1.mp4, How to Fix Bubbles in Drywall Tape - Krista Howard. This was easy AND fun! Never in my life did I ever imagine myself building a wall, but here in my sixties, I've just helped build one! To ensure our content is always up-to-date with current information, best practices, and professional advice, articles are routinely reviewed by industry experts with years of hands-on experience. From that mark, drop a plumb bob and mark the floor. We used the Ridgid pneumatic palm nailer with a Ridgid compressor to attach them. The drawing below explains the location of each doorway component. In my basement I'm looking to add a couple partition walls. Three horizontal boards for the bottom and top plates, 8 studs and metal plates to hold it all together. When building a partition wall that is attached to a concrete floor, use a Ramset gun. We are thrilled to be a part of the One Room Challenge and well walk you through the process of our transformation over the next eight weeks. Thank you. to this site, and use it for non-commercial use subject to our terms of use. Proudly made in Britain by MacLellan Creative Limited, Registered in England & Wales, Company number 12667542, VAT number 384 2613 89. NOTE: A 2X4 wood stud is not actually 2X4 in dimension. The first one was nailed to the existing side wall. We had the luxury of being able to tie into an existing wall stud, but weren't so lucky when it came to tying into a joist in the ceiling. One interior door. If you only have a drill, then screws may be easier. Watch the demonstration below to see how the tool works. These Simpson Strong-Tie stud plates were just what we needed. The partition wall in a garage is framed using a base plate, a top plate and several 2X4 vertical studs, spaced 16 OC. Copyright 2022 This Old House Ventures, LLC. Doing this project yourself is fairly straightforward and can be inexpensive, assuming the price of lumber does not continue to increase (dont get me started on that topic :o)). Cost for insulation, drywall and other finishing touches would be additional. There are several options when it comes to partition wall sheathing. However, you can use a top plate and a double top plate to make sure your partition wall is sturdy and can take a few knocks. Its small size makes it maneuverable and easy to store. Before I dive into the steps of building a garage partition wall, note that sometimes the easiest way to build a wall is to build it on the floor. ), What Type of Drywall is Best for Your Garage? Simply follow the steps above and you will have your basic stud partition wall built in less than a day! For a partition wall a single top plate is sufficient as the wall is not load bearing. The studs were installed at 610mm centres to match up with the size of the MDF sheets. You may like to add a bit of water for better flow, but only for the first coat. What Type of Garage Ceiling Is Best for You? Yes! If the partition runs perpendicular to ceiling joists, drive one 16d nail through the top plate into each joist. When all the pieces have been nailed together, tilt the wall into position so that the face edge of the top plate lands alongside the line on the ceiling. There is a neat alternative to toenailing. Since you mentioned an uneven floor, you may save yourself some headache by building piece by piece like we did in this post. If the wall sits in line with a joist, drive one 10d nail through the plate in each stud bay and into the subfloor. to get Mother Daughter Projects updates in your email! Nail the boards to the frame using your nail gun.
Line up the ends of the cripples with the top plate and header. (note: use the Ramset primarily when building interior walls. King Studs just like normal studs, except they are along the rough opening, Jack Studs installed against the king studs to frame the door opening, Cripple Studs short studs that connect the header to the top plate, Header is above the jack studs, just the width of the door to distribute load. Typically load bearing walls require, at minimum, a double top plate and non-load bearing walls (ie: partition walls) only need a single top plate. We keep this site running through affiliate links and product sales. For the wall we are building, you will need 4 since the number isnt even with a 5-foot long wall.Step Three- Arrange the WoodSet the 2X4 boards on the floor.